

Snowflake Cost Management: Insights from 100+ Customers
Ian WhitestoneTuesday, May 14, 2024
When managed properly, Snowflake can provide the most cost-effective data cloud platform in the market. However, many customers struggle to confidently control their Snowflake costs due to the platform’s ease of use and widespread adoption within organizations.
At SELECT, we’ve worked with over 100 companies to help them implement cost management and optimization strategies for Snowflake. These specific strategies can be grouped into 6 key areas, which we believe should form the foundation of your Snowflake cost management strategy. In this post, we’ll dive into those 6 key areas and share practical lessons learned from working with our customer base.
1. Visibility
Before you can have any impact on your costs, you need to have cost visibility tooling in place. Without knowing what is driving your Snowflake consumption and how those items are changing over time, you won’t know where to focus your efforts.
If you’re in charge of managing Snowflake costs, you should be able to quickly & easily answer the following questions:
- What is our average monthly Snowflake spend?
- How much of our purchased contract value are we forecasted to spend?
- How much are you spending per year (in $, not credits) on each virtual warehouse, serverless task, database, etc.?
- What is the cost of each query workload running in your environment?
- How much consumption is each user or team driving in your account?
- How have each of these items changed over the last X days?
Cost Management in Snowsight
The Snowflake Cost Management section under Admin is a great place to start. From here you’ll be able to identify:
- Organization level costs:
- Total contract value
- Remaining balance
- Total spend
- Account level credit (not $) consumption:
- By service type
- By resource (i.e. virtual warehouse)
It’s important to note that the credit consumption values in the Snowflake consumption tab can be overstated by up to 10%, due to the inclusion of Cloud Services credits. Customers are only billed for cloud services consumption if it exceeds 10% of their daily compute costs. Most customers will not be charged for cloud services costs, and therefore the numbers in the screenshot above will almost always be inflated. Learn more here.
The need to go deeper
Most Snowflake customers will eventually outgrow the Cost Management UI in admin and end up either investing significant internal resources in building their own monitoring dashboards or leveraging a trusted third-party platform like SELECT.
This ultimately boils down to one reason: the need to go deeper. The Cost Management UI does a good job of giving you a breakdown of your spending and telling you about your largest consumption drivers. In the screenshot above, we can see that the top warehouse makes up most of our costs. But why? What within that warehouse is actually driving those costs?
To improve cost visibility within your virtual warehouses, we recommend calculating the cost of each query and then aggregating those into workload-level costs using query metadata. Query metadata could be custom query tags/comments you add to your queries, or come from metadata added from tools like dbt or Looker. Once that is in place, you can easily understand the actual compute drivers across each of your virtual warehouses:
Outside of virtual warehouses, there are other Snowflake services that can drive meaningful consumption such as Snowpipe, Automatic Clustering, Search Optimization and Query Acceleration. To effectively manage costs, you need to have detailed visibility into each Snowflake resource and how its consumption is trending over time. Most importantly, it should be one click away.
Here’s an example of a dashboard you can build showing a single table’s Automatic Clustering costs.
Here’s another example showing the costs of a single Snowpipe, along with recommendations on how to lower costs:

2. Attribution
Once you’ve built up an understanding of your cost drivers, you’ll want to have flexible ways to allocate those costs to different areas.
Common ways of attributing costs include:
- Using Snowflake’s object tags to assign virtual warehouses and other Snowflake resources to teams, departments or projects
- Adding metadata to your queries using query tags which identify the team, project or use case the query belongs to
- Manually assigning resources to different groups in your reporting tool
Any cost reporting tool you build or buy should allow you to flexibly allocate costs to different groups, and then easily visualize and track their usage over time. Here’s an example of our Snowflake account spending broken down by Usage Group:
When analyzing your costs by department or project, you’ll often spot opportunities or spend drivers you wouldn’t normally see when analyzing costs by individual resources.
3. Controls
While cost visibility and attribution will tell you how much you are spending, you’ll also want to implement controls that can prevent unnecessary spending from occurring in the first place. There are four different controls we recommend Snowflake customers consider employing as part of their cost management strategy
Access Control
Snowflake has robust access control capabilities that allow customers to maintain fine-grained controls over who can do what in Snowflake. Access control is an often overlooked tool for controlling costs. For example, limiting which users have access to run queries on larger, more expensive virtual warehouses can be very effective. Similarly, restricting access for the creation and modification of warehouses can prevent users from accidentally spinning up very large warehouses which drives unnecessary consumption.
Query Timeouts
Query timeouts serve as a safeguard within Snowflake, designed to halt queries that exceed a predetermined duration. This feature acts as a preventive measure against excessive expenses resulting from prolonged query execution. When a query surpasses the specified timeout threshold, Snowflake automatically terminates it.

Employing query timeouts effectively helps control the impact of runaway queries. By default, Snowflake permits queries to run for up to two days before canceling them, potentially accumulating substantial expenses. We recommend implementing query timeouts across all warehouses to cap the maximum potential cost incurred by any single query.
Resource Monitors
Similar to query timeouts, resource monitors allow you to restrict the total cost a given warehouse can incur. You can use resource monitors for two purposes:
- To send you an email once costs reach a certain threshold
- To restrict a warehouse from costing more than a specified amount in a given period. Snowflake can prevent queries from running on a warehouse if it has surpassed its quota.
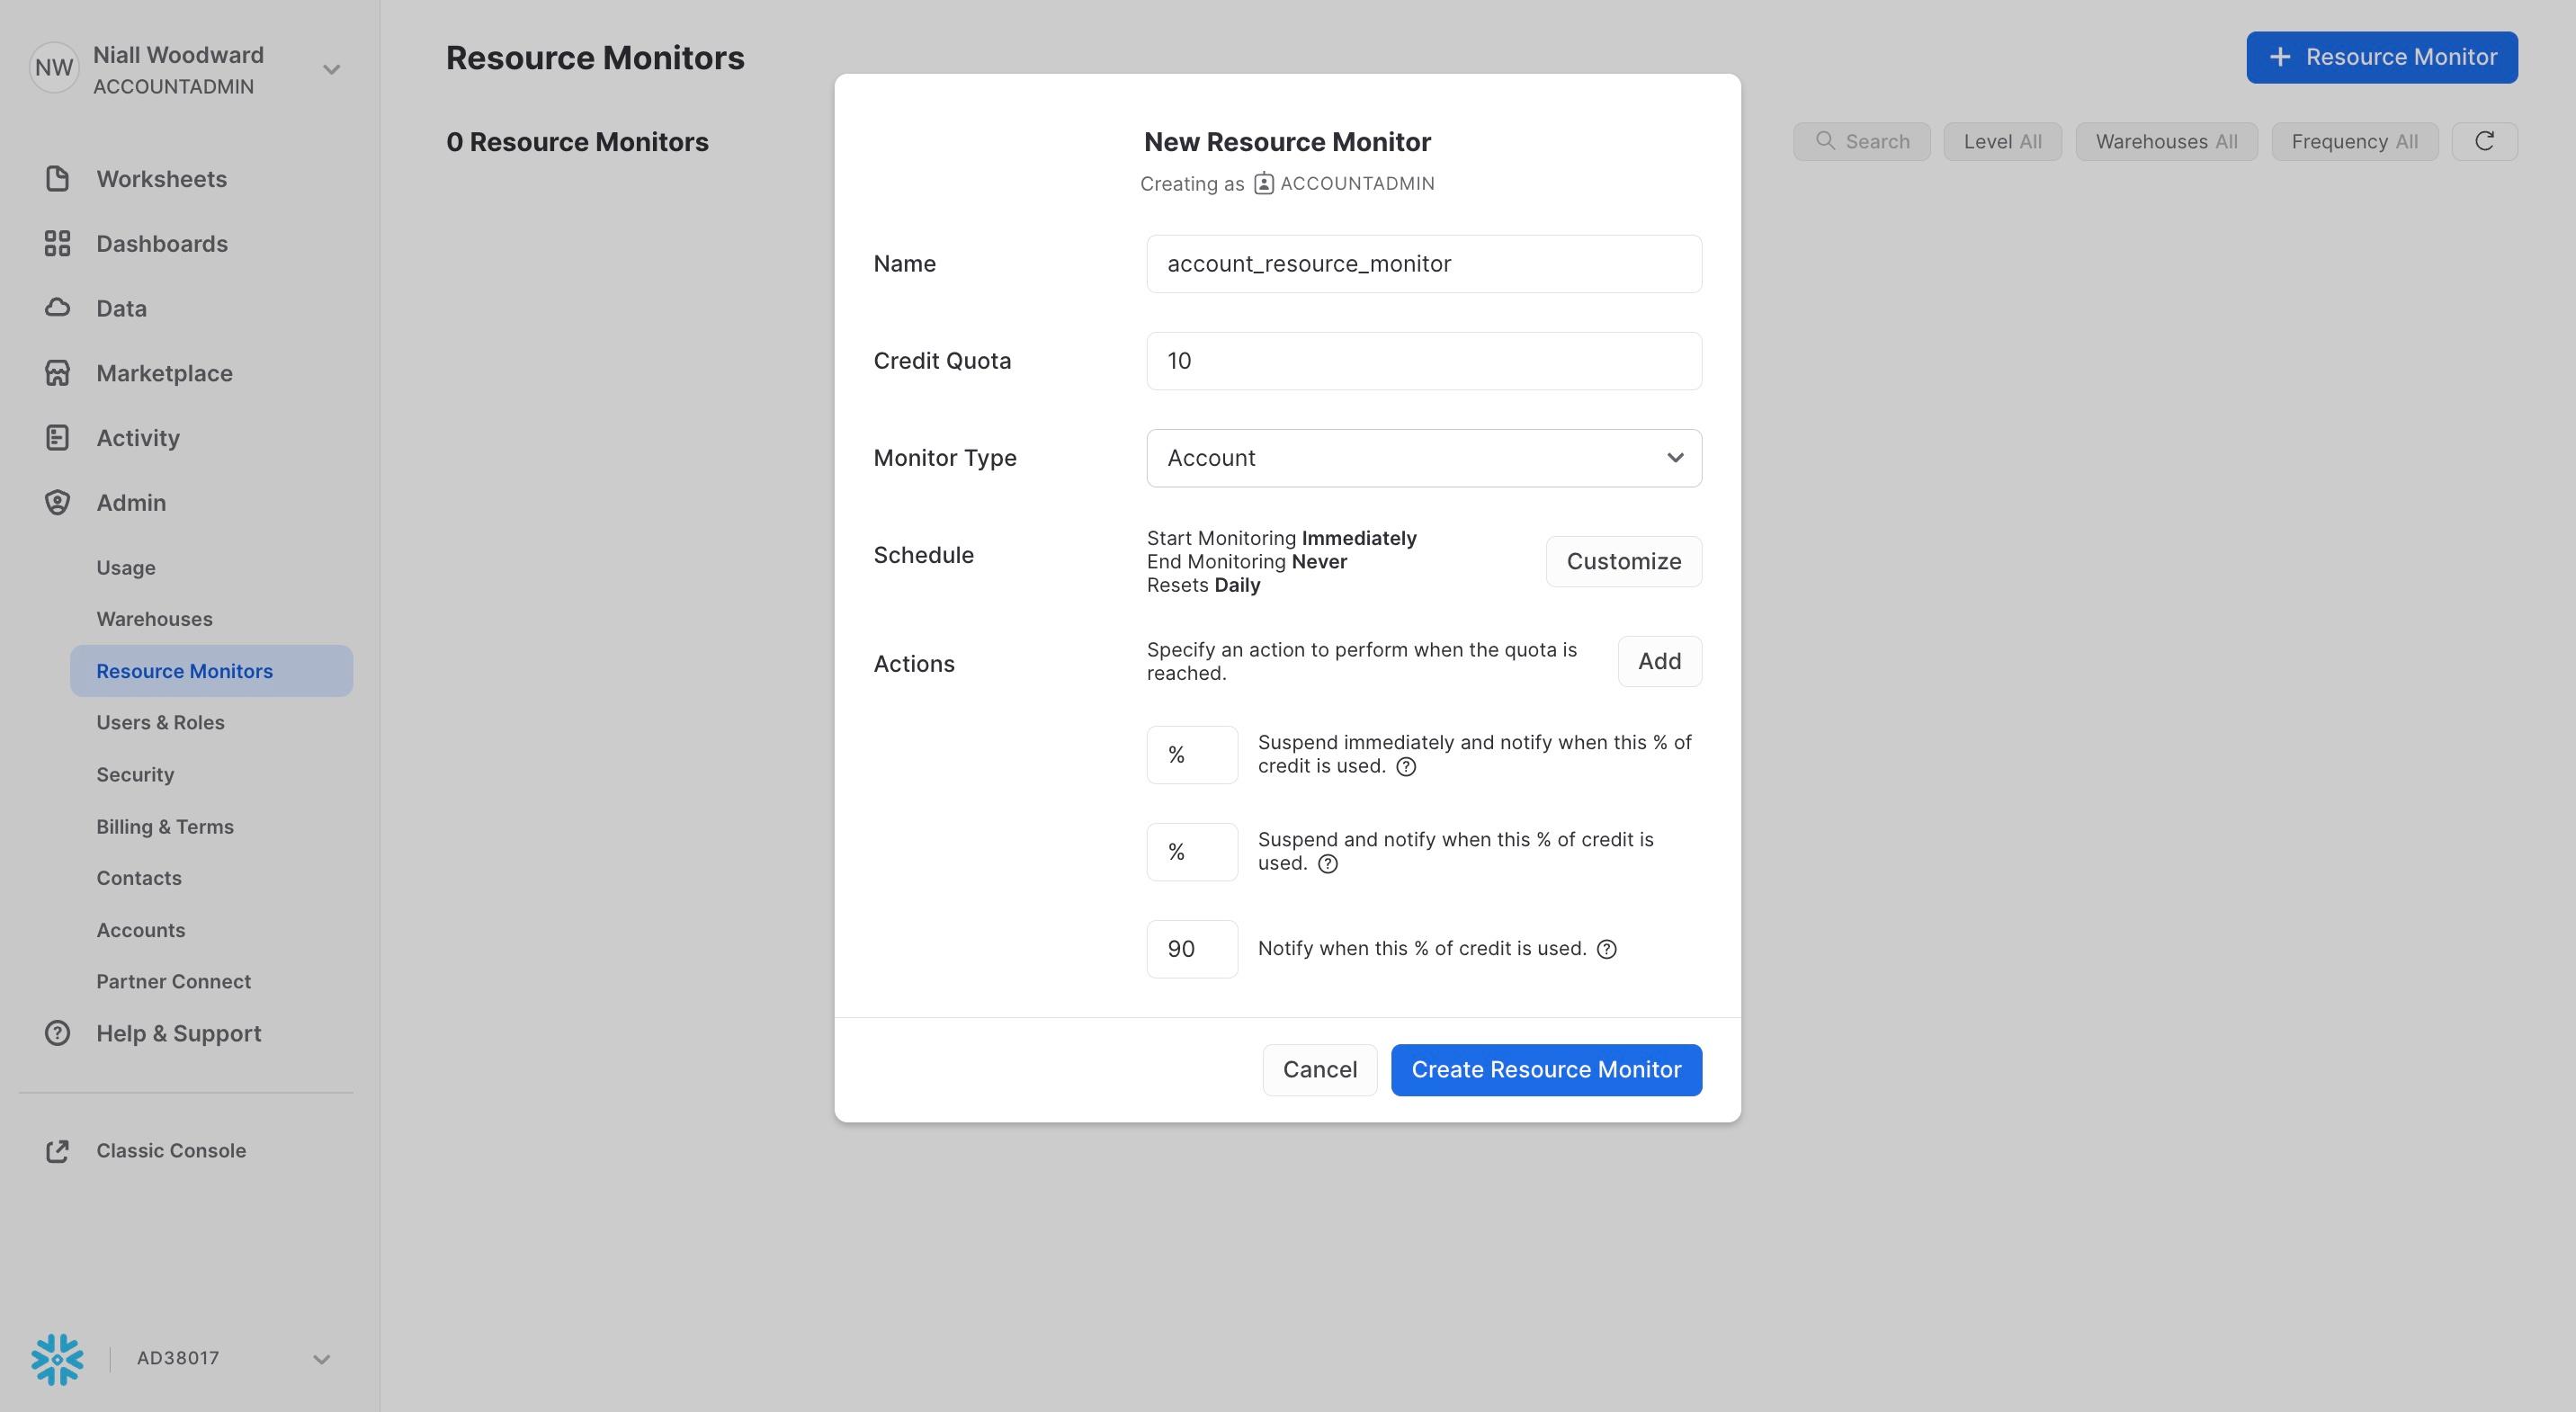
Most customers will not implement the warehouse shutoff functionality (point 2 above) as it has the potential to significantly disrupt business operations and internal employees day to day work. If you don’t have alerting capabilities offered by another tool, then using resource monitors to get notified of excessive warehouse spend (point 1 above) is a recommended practice.
Budgets
One of the best ways to control costs is to give each group of Snowflake users a budget and enforce it. If users/teams/departments are not told how much they can spend, there will be no incentive for them to reduce their consumption or spend carefully.
Budgets help build a culture of cost awareness by making it clear how much each team has spent and how much more they can spend.
4. Alerts
Even with controls in place, there can still be surprise spikes in your bill or gradual shifts in spending over time. To stay ahead of these issues, we recommend implementing two types of alerting mechanisms: anomaly alerts and scheduled spend digests.
Anomaly Alerts
Anomaly alerts should be configured to notify you if spending spikes above a predetermined threshold. You can configure these at the account level, for a particular warehouse, or for a grouping of Snowflake resources/users (i.e. a Usage Group).
As the name implies, the purpose of these alerts is to notify you of abnormal behavior. Perhaps an expensive new job was shipped? Or automatic clustering was enabled on a large table? Or maybe someone changed the warehouse size?
The sooner you know about these changes, the quicker you can make the necessary changes. The screenshot below shows an example Snowflake spend anomaly alert. If possible, you should build your alerts in a way that provides the user with as much context as required to identify the cause of the spike in spending.
Scheduled Spend Digests
Many changes in your spending patterns are more gradual in nature and can easily go undetected. To combat this, we recommend setting up scheduled spend digests. The idea is to send a snapshot of your Snowflake usage on a set schedule (i.e. weekly or monthly).
Delivering these digests to popular destinations like email or Slack will reduce the barrier to staying on top of your spending. These digests can help users spot trends or expensive workloads that would otherwise go unnoticed. If you’ve set up budgets, you can include a projection of how much the given group of resources is forecasted to spend.
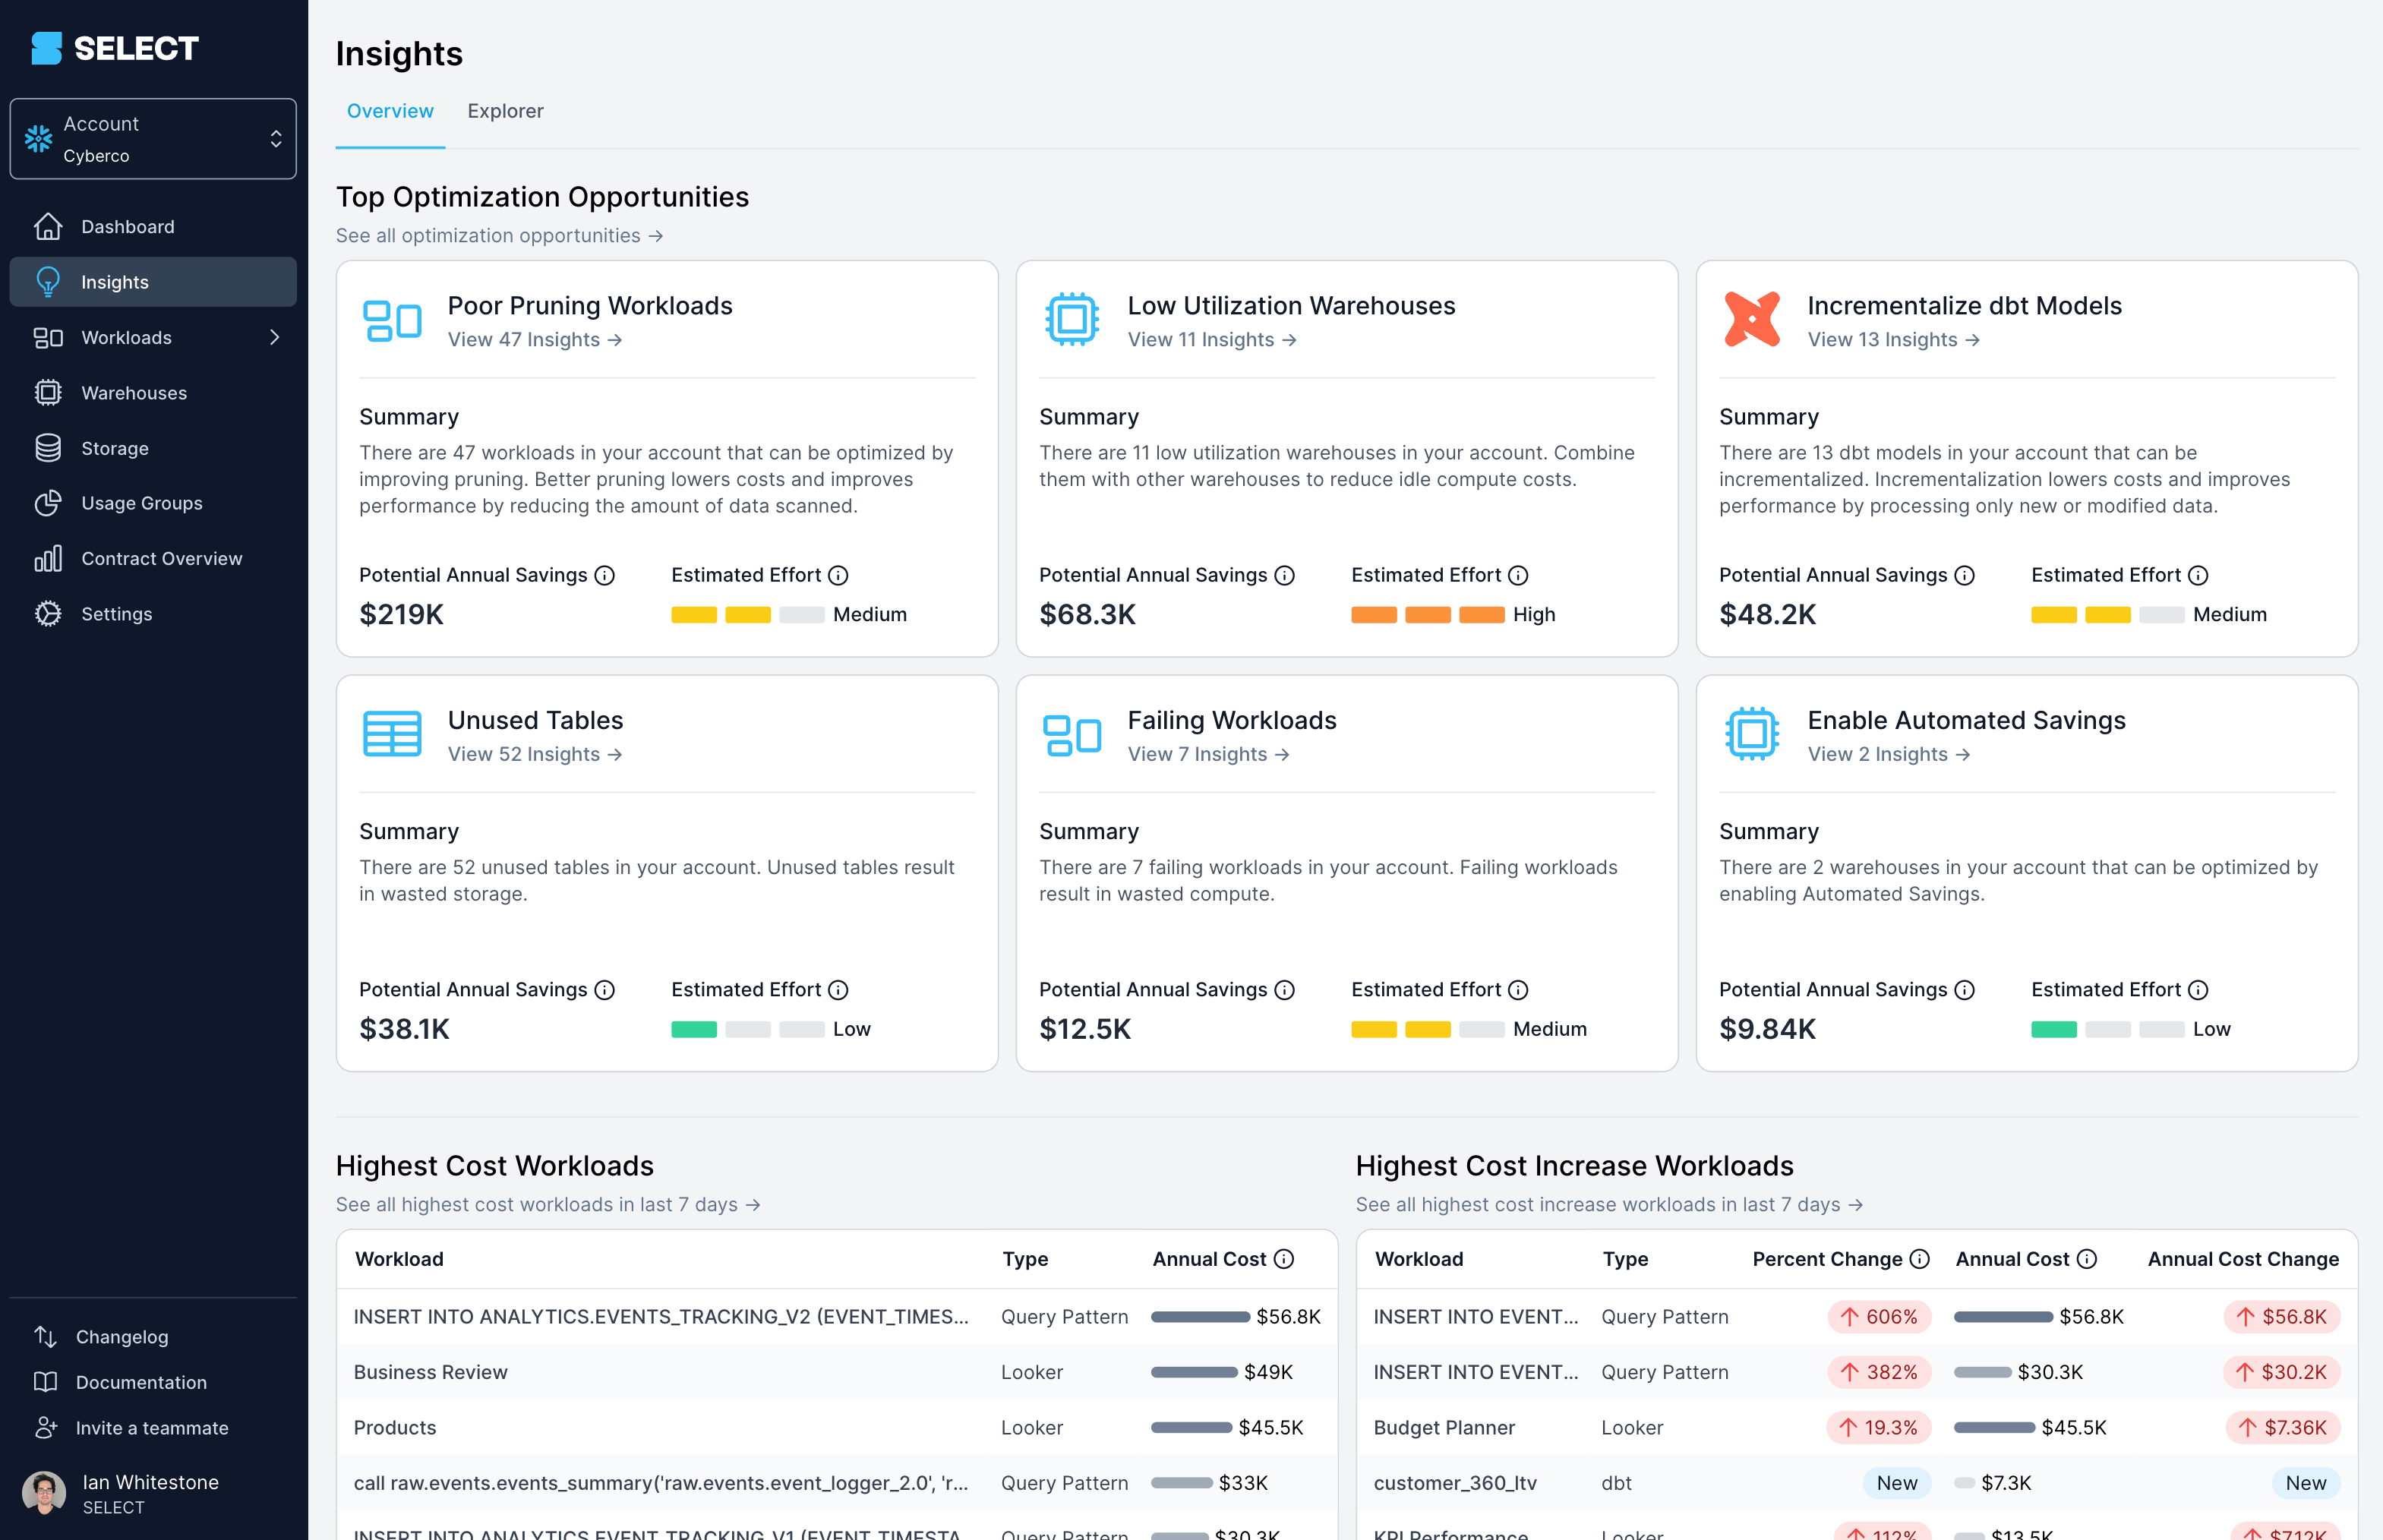
5. Insights
While it’s important to understand what your major consumption drivers are, most users want to know whether they’re using Snowflake effectively and what they can do to optimize their usage or lower costs.
If you’re in charge of managing Snowflake costs, you’ll want to invest in tooling and systems to automatically flag optimization opportunities to the various Snowflake users in your organization. These insights should highlight common query optimization and cost reduction strategies, such as:
- Identifying workloads that are not pruning micro-partitions and scanning too much data
- Identify oversized warehouses, or workloads that are running on the wrong warehouse size
- Flag unused tables that have not been queried and are racking up unnecessary storage costs
- Identify workloads that are repeatedly failing
- Flag queries with misconfigured join keys leading to exploding joins
6. Automations
Surfacing Insights to users is a necessary component of any Snowflake cost management strategy since many optimizations must be implemented manually. With that said, many employees in your organization will often be busy with other business initiatives and won’t have time to implement the necessary changes.
Wherever possible, you’ll want to automatically apply Snowflake optimizations on an ongoing basis. Examples of this can include:
- Automatically adjust the virtual warehouse configuration to improve utilization efficiency
- Creating automated data deletion policies (i.e. deleting any tables or non-production databases/schemas after X weeks)
- Deprecating unused dashboards or data assets that sit on top of Snowflake and drive consumption
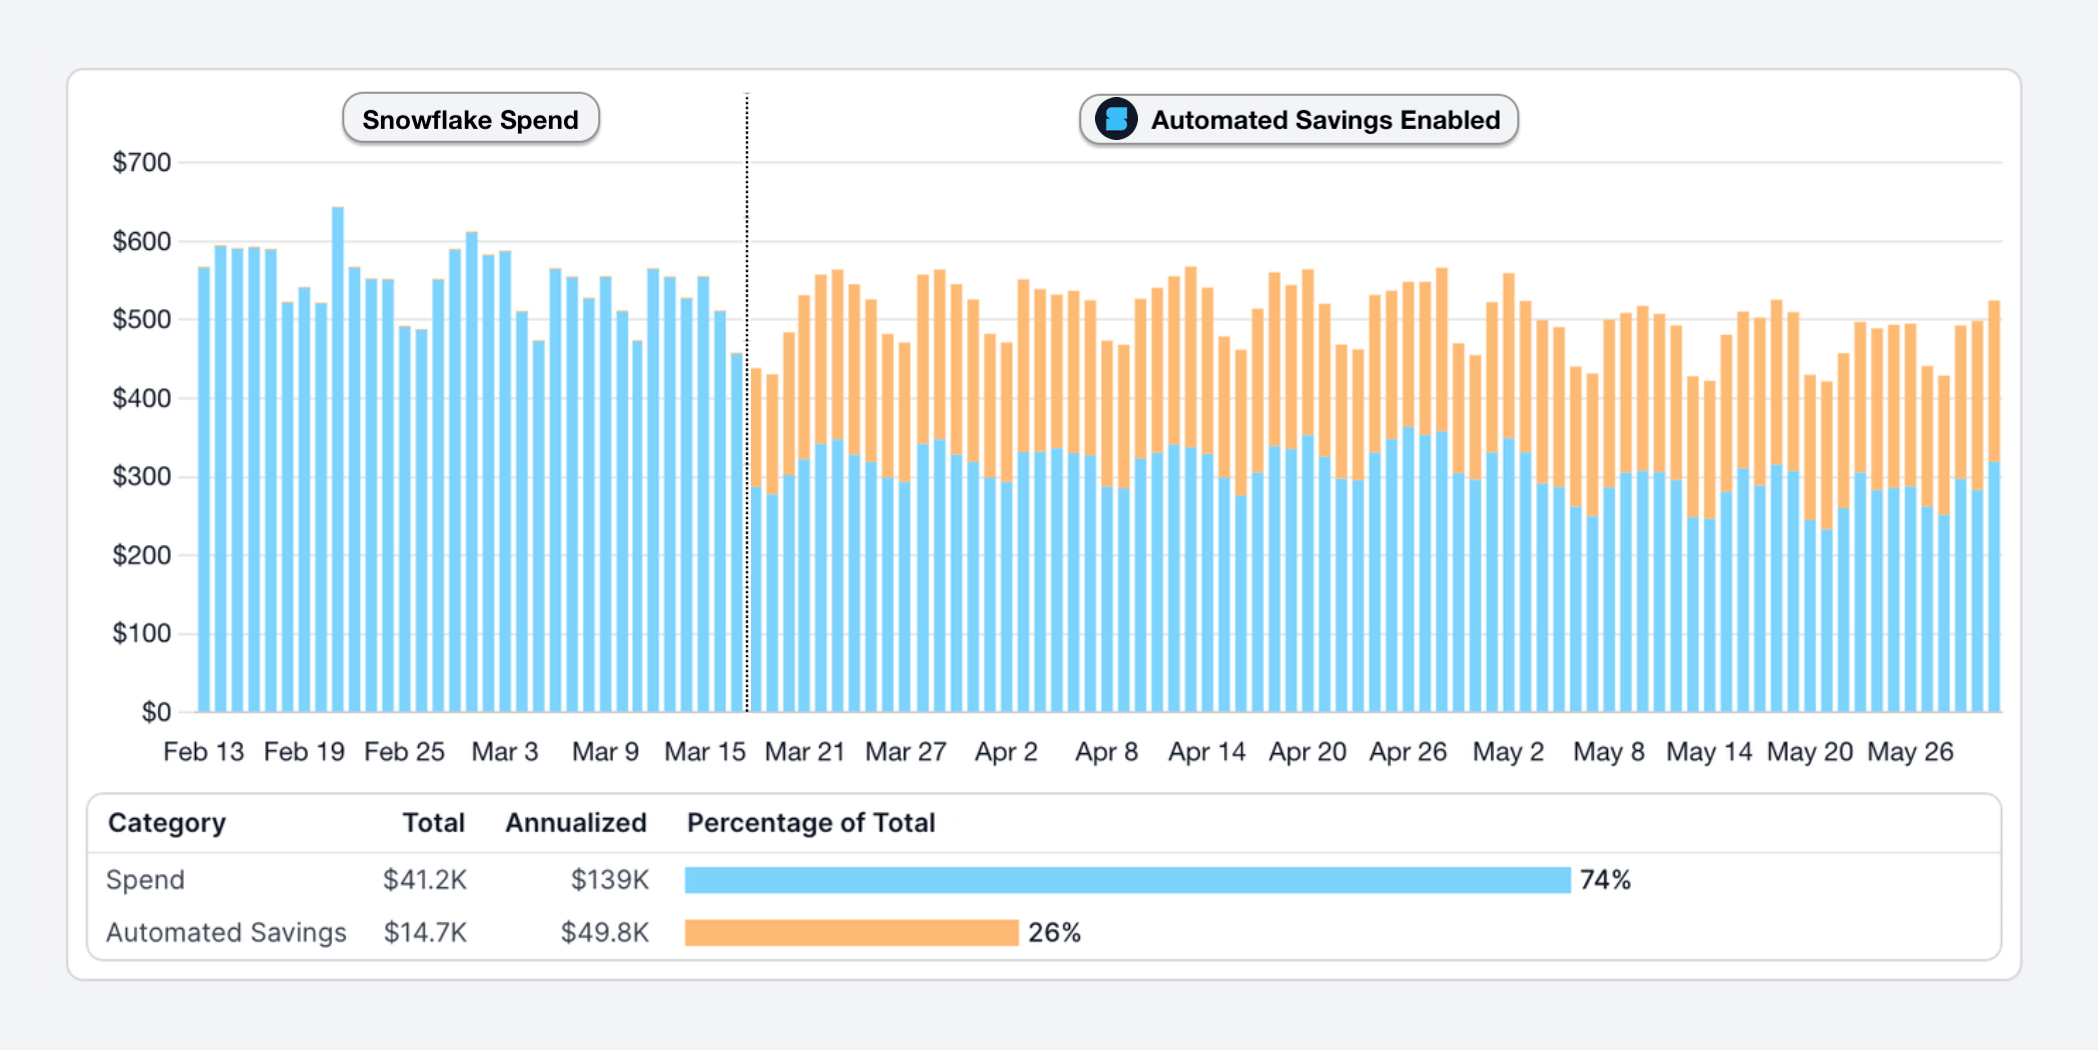
Building & maintaining these automations can require significant engineering resources, but can often yield significant cost savings. The screenshot below shows an example from SELECT’s Automated Savings feature which automatically & continuously adjusts virtual warehouses to optimize utilization efficiency.
Lessons Learned
In this post, we’ve covered the 6 key components of an effective Snowflake cost management strategy. We consider ourselves lucky to have had the opportunity to work with over a 100 companies to help them implement these strategies. Outside of the strategies shared above, here are a few additional lessons we’ve learned along the way:
Expand your cost management strategy incrementally
Building out the necessary tooling for an effective cost-management strategy takes a lot of time. If you’re committed to doing this in-house, we recommend starting with building out granular cost visibility and usage reporting. You cannot make any strategic cost decisions until you have a good understanding of your usage drivers.
Once you have basic visibility in place, you can start thinking about your cost attribution strategy, or implement controls and alerts to stay on top of your usage.
Tackle low-hanging optimization opportunities first
Before building out any automations, it’s important to tackle the low-hanging fruit first. We’ve written extensively about different cost optimization strategies you can tackle in your account. Deprecating unused data assets, decreasing run frequencies and downsizing warehouses can often result in 10-20% of immediate savings.
Decentralizing cost management is the only scalable solution
Having worked with many large organizations, we’ve witnessed firsthand how difficult it can be for central data platform teams to police costs and enforce best practices across a large Snowflake user base.
Instead, try and build a culture of cost awareness and shared responsibility. You need to empower users around the organization with the necessary tools, processes and knowledge to effectively use Snowflake. Once users (a) become aware of how their actions impact Snowflake usage and (b) have a low-friction way to understand how to optimize, they will be much more likely to take action.
Additional Resources
We hope you found this blog post useful. If you’re looking for additional materials on Snowflake cost management and query optimization, you can check out the following resources:
- Snowflake Cost Optimization: 15 proven strategies for reducing costs
- Snowflake Query Optimization: 16 tips to make your queries run faster
- The Analytics Engineering Podcast: Cloud warehouse cost optimization
- The Missing Manual: Everything You Need to Know about Snowflake Optimization | SELECT
- Extend the runway: A deep dive into data warehouse costs
- Snowflake Pricing Explained | 2024 Billing Model Guide

Ian is the Co-founder & CEO of SELECT, a SaaS Snowflake cost management and optimization platform. Prior to starting SELECT, Ian spent 6 years leading full stack data science & engineering teams at Shopify and Capital One. At Shopify, Ian led the efforts to optimize their data warehouse and increase cost observability.
Want to hear about our latest data cloud learnings?Subscribe to get notified.
Get up and running in less than 15 minutes
Connect your Snowflake, Databricks, or BigQuery account and instantly understand your savings potential.

