Snowflake Snowpipe: The Definitive Guide (2024)
Tomáš SobotíkSunday, February 11, 2024
This is the third part of our series related to data loading in Snowflake. Just to quickly recap, we covered the five different options for data loading in the first post. The second post was dedicated to batch data loading, the most common data ingestion technique.
This post follows up on it with a deep dive into the next data ingestion method: continuous loading with Snowpipe.
What is Snowpipe?
Snowpipe is a fully managed data ingestion service provided by Snowflake.
If you’re familiar with batch data loading using the COPY command, you can think of Snowpipe as an "automated copy command." Snowpipes are a first-class Snowflake object, meaning you create and manage them via SQL like any other Snowflake object.
Snowpipe automatically loads files from an external stage based on notifications about newly landed files. The delivered notification triggers processing on the Snowflake side, where Snowflake runs the COPY command defined in the Snowpipe. Notifications are based on the notification service on the cloud provider side, such as AWS SQS/SNS.
What is the difference between Snowpipe and COPY?
The main difference lies in the compute model and automation. Snowpipe is a serverless feature, meaning you don't need to worry about the virtual warehouse for running the Snowpipe code (sizing, resuming, suspending, etc.). Snowflake automatically provides a compute cluster for Snowpipe. In terms of automation, the COPY command requires scheduling, ensuring the command runs at an exact time. In contrast, Snowpipe is triggered automatically based on received notifications, resulting in lower latency.
How to create a Snowpipe?
Before creating a Snowpipe, it's important to understand the overall data loading architecture. The Snowpipe object does not work in isolation. In addition to it, you will also need storage integration, stage, and file format definitions. We covered the creation of those objects in the previous post on batch data loading.
Once the necessary stage, storage integration and file format objects are created, a Snowpipe object can be created with the following code:
One of the important parameters to note here is AUTO_INGEST, which specifies whether you want to load files based on received notifications (TRUE) or call Snowpipe REST API with a list of files for ingestion (FALSE).
Configuring event notifications for Snowpipe in AWS
In addition to the Snowpipe object definition, you must also configure a notification integration. In order to be able to automatically load files, Snowpipe needs to receive notifications from the cloud provider about new files.
Once you create a Snowpipe object with AUTO_INGEST = TRUE, Snowflake automatically assigns a notification channel to it. If you are using Amazon Web Services (AWS), Snowflake uses Amazon Simple Queue Service (SQS) for receiving notifications. The SQS ID value can be found in the notification_channel column in the output of DESC PIPE mypipe.
For Snowpipe auto ingest to work, notifications about new files need to be sent to this queue. Luckily for us, this system can be built using the event notification feature for S3 to send a messages to the queue.
Create event notification
Open the S3 bucket containing the files you want to load with Snowpipe. Go to the properties tab and find the configuration for event notification. Create a new one with the desired name, and possibly configure the prefix to limit the notification to relevant files. In case you have multiple directories and Snowpipe should load files only from a single one, define it to reduce cost, latency, and event noise.
Scroll to the bottom of the screen where the destination configuration is. Select SQS and paste the value you got from DESC PIPE mypipe command shown above.
And that’s it! Now whenever there is a new file landed in S3, Snowpipe will be notified and can trigger the COPY command automagically 🪄.
Managing Snowpipes
There are a bunch of helpful commands to help you manage Snowpipes. Let’s deep dive into them
Listing & Describing Snowpipes
We have already used DESC PIPE mypipe above, providing basic information about the given pipe. The same output, but not filtered for a single pipe, can be provided by the SHOW PIPES command.
Snowpipe Status
The PIPE_STATUS system function provides an overview of the current pipe state. The output includes several values such as the current state, information about the last ingested file, and whether there are any pending files.
To get such an overview, run SELECT SYSTEM$PIPE_STATUS('mypipe');
The function output is a JSON structure:
Pausing a pipe
A pipe has an execution state. When you create a Snowpipe, it automatically gets a RUNNING state. There's no need to activate it like you do with a Snowflake task. However, there might be situations when you would like to pause the pipe for a while:
- Changing the ownership of the pipe
- Manipulating with the files in the source directory
- Testing the upstream process generating the files
- To pause the execution of the pipe, Snowflake has the parameter
PIPE_EXECUTION_PAUSED.
Pause the execution of a Snowpipe with the ALTER statement:
This ALTER statement changes the state of the pipe to a PAUSED state. New files could still be delivered to the stage directory, but they won’t be processed until the pipe is resumed. Be aware that a pipe could become stale if it is paused for longer than the retention period for received event messages (14 days by default). To resume a pipe, change the parameter back to FALSE:
Snowpipe Error Notifications
Snowpipe can also be integrated with cloud messaging services (e.g. AWS SNS) and send notifications in case of any failures. The operations team can react to such notifications and resolve the issue before it would be spotted by business users. To enable error integration, there are several configuration steps on both the Snowflake and cloud provider sides:
- Create AWS SNS Topic
- Create AWS IAM Policy
- Create AWS IAM Role
- Create the Notification Integration (Snowflake side)
- Grant Snowflake access to the SNS topic
- Enable error Notification in Snowpipe
To enable error notification in Snowpipe, you can use the ALTER PIPE command:
For a deep dive into how to set this up, you can review our previous posts on creating error notifications for Snowflake Tasks or our more general overview on Snowflake Alerting.
Snowflake Snowpipe Costs
With Snowflake cost management being an important priority for all Snowflake customers, it's important to understand how Snowpipe is billed.
Snowpipe is a serverless feature, meaning you do not need to worry about providing and sizing the compute cluster for Snowpipe loading. In Snowflake, each serverless feature uses a different pricing model than the model used for virtual warehouses.
Snowpipe compute costs are 1.25x the regular virtual warehouse compute costs (reference: Snowflake Credit Consumption Table). For example, if Snowflake uses the equivalent of an X-Small warehouse to load your data, you will be charged 1.25 credits instead of 1 credit per compute-hour.
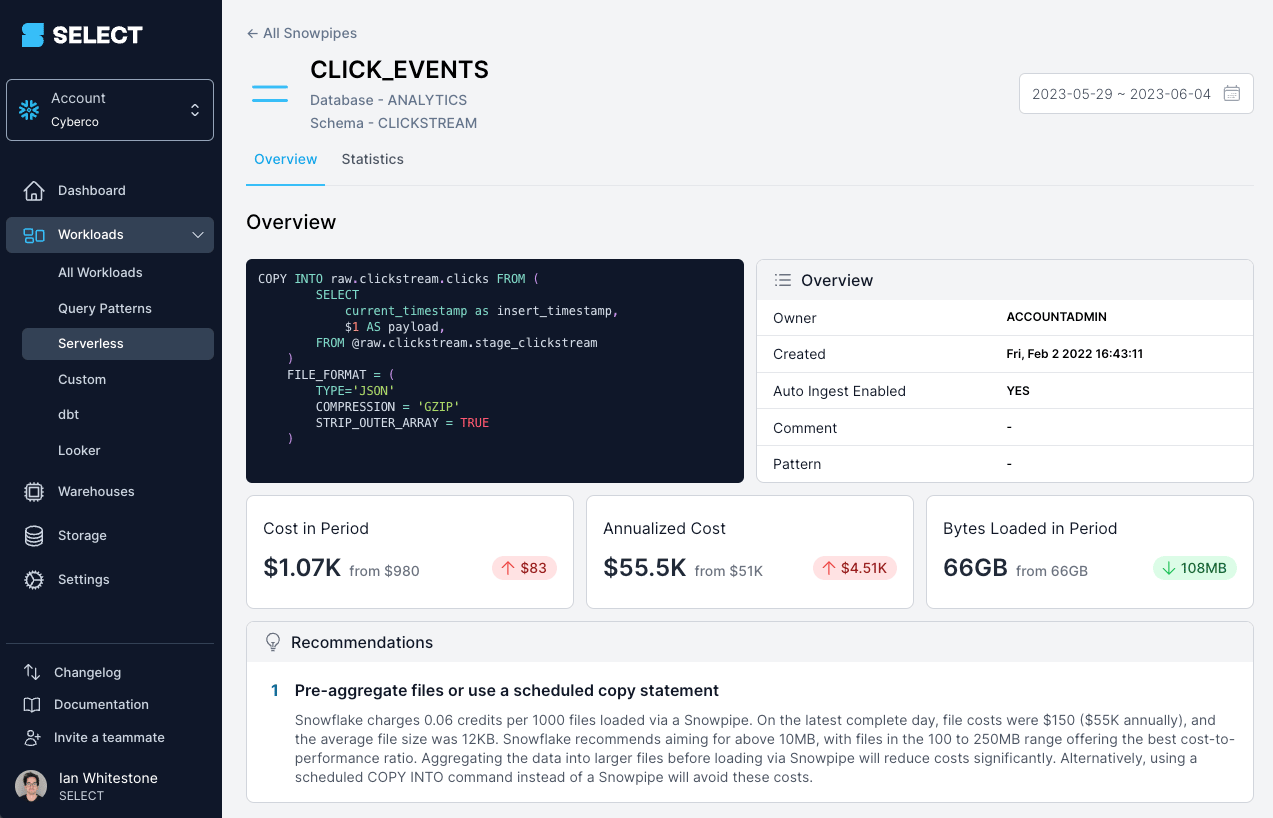
In addition to the Snowflake-managed compute costs, there is an additional file overhead fee: a charge of 0.06 credits/1000 files loaded. As a result, it's very important to ensure your files are optimally sized when using Snowpipe.
If you're using a tool like SELECT, you'll be able to easily see when there are significant Snowpipe cost optimization opportunities based on your file sizes:

Alternatively, you can identify this yourself using the metadata views discussed below.
How to monitor Snowpipe costs?
Snowflake keeps detailed metadata about your Snowpipe usage. You can use this data to get an overview of your costs. Let’s have a look at some ACCOUNT_USAGE views providing Snowpipe data. If you would like to get details about all your Snowpipes, you can use the PIPES view and the following query:
This provides a complete list, including deleted pipes. You can add a condition WHERE DELETED IS NULL to get only currently existing pipes.
Using the Snowpipe History View
To calculate Snowpipe cost, you can use PIPE_USAGE_HISTORY. Custom calculations are required to include credits charged as an additional files overhead fee.
Snowpipe best practices
Let’s highlight a few best practices related to using Snowpipes. As discussed earlier, the most important factor for Snowpipe is to ensure your files are sized correctly. Snowpipe can be very ineffective and costly when ingesting a lot of small files. We can demonstrate that on a simple example with loading of 100 GB data daily:
| Data size | Individual file size | Number of files | Credits/day (file overhead fee) | Cost/year (file overhead fee)cost/year (file overhead fee) |
|---|---|---|---|---|
| 100 GB | 25 KB | 4.2 million | 251 | $275K |
| 100 GB | 250 MB | 410 | 0.06 | $66 |
As you can see, loading a huge amount of very small files can lead to high costs related only to the file overhead fee. When we size files according to the recommendation (100 - 250 MB), the yearly cost is insignificant.
A similar recommendation is related to using compressed file formats (e.g., gzip) over uncompressed (e.g., CSV). Snowflake performs better on compressed formats, and you have other benefits like transferring significantly lower amounts of data over the network + storage requirements are also lower.
I would also mention implementing filters for file notifications to limit sent notifications only to relevant files and not everything happening inside your bucket.
Advantages and Disadvantages of Snowpipe
To wrap up, let's discuss the main benefits of using Snowpipe over the COPY command.
Snowpipe offers simplicity and reduces management overhead. It brings automation and near-real-time data ingestion. With the serverless model, it can save you from challenges related to right-sizing the compute cluster. It reacts better to changing needs in workload size. For most use cases, Snowpipe will be a better option than the COPY command. Where it won’t work well, especially from a cost point of view, is when the files are not correctly sized.
Check out our previous post for a more detailed comparison of the different data loading options in Snowflake.

Tomas is a longstanding Snowflake Data SuperHero and general Snowflake subject matter expert. His extensive experience in the data world spans over a decade, during which he has served as a Snowflake data engineer, architect, and admin on various projects across diverse industries and technologies. Tomas is a core community member, actively sharing his expertise and inspiring others. He's also an O'Reilly instructor, leading live online training sessions.
Want to hear about our latest Snowflake learnings?Subscribe to get notified.
Get up and running in less than 15 minutes
Connect your Snowflake account and instantly understand your savings potential.


