Snowflake Roles 101: Comprehensive Guide to Access Control
Jovan SakovićSaturday, March 09, 2024
Snowflake has become one of the key players in the data space, providing customers with a versatile data cloud platform that enables all kinds of analytical capabilities. To do this safely and securely, Snowflake provides a flexible suite of access control and management features.
A good understanding of best practices around managing access to Snowflake is essential. Without implementing careful design, roles and grants can quickly become hard to manage, resulting in duplication, inconsistencies and ultimately risks to the security of your data. Following a set of well-defined standards and patterns achieves security, transparency, and simplicity.
In this post, we’re diving into key concepts and how best to control access in Snowflake. Whether you're a Snowflake administrator or data engineer looking to better understand access control, this post is for you.
Key concepts in Snowflake access control
Snowflake follows a Role-Based Access Control (RBAC) approach to managing what users and other systems can access and do. In RBAC, having a certain role means being granted certain privileges.
Let’s introduce some language:
- User - An entity that enables a person (or service) to connect to Snowflake
- Object - An entity that a User can access (i.e. table, view, database), if they have the right privileges.
- Privilege - An operation that a User could execute on an Object, if their Role has been granted it.
- Role - A bridging entity between Users and Privileges. Privileges are granted to Roles, and Roles are granted to Users.
In short, as Snowflake summarises it:
Privileges are granted to roles, and roles are granted to users, to specify the operations that the users can perform on objects in the system.
Using these 4 key concepts, sections and diagrams that follow will build on top of each other — getting us to a minimal, but complete, access control setup.
Users
A Snowflake User is an identity that can connect to a Snowflake Account and run a set of allowed operations. Every person in your data team should have a Snowflake User that they use to connect to Snowflake and run queries. A Snowflake User can also be used by a third-party system - examples include BI tools (e.g. Tableau or Looker) or ELT tools (e.g. Stitch or Fivetran).
Ultimately, what Snowflake Users are able to do is the main concern of access control.
Objects
Objects are Snowflake primitives to which access can be granted. The most obvious objects are databases, schemas and tables, but also include account level objects such as warehouses, storage integrations etc.
Here are some common examples of Snowflake Objects:
| Securable Object | Level | Description |
|---|---|---|
| Database | Account-level | Databases are the key objects keeping all the other securable objects isolated and logically grouped. |
| Schema | Database-level | A logical grouping of objects like tables, views, stages, etc. |
| Table | Schema-level | The object that contains data and takes up physical storage. In most cases, tables are the keystone of making Snowflake useful. There are a couple types of tables, each serving different use cases. |
| View | Schema-level | A table in disguise. It provides access to data, but does not actually take up storage. A view is defined as a query on top of other tables. There are a couple types of views, each serving different use cases. |
| Virtual Warehouse | Account-level | Main compute resources that are required to run queries, or loading data into Snowflake. |
| Storage Integration | Account-level | An object that connects an S3 (GCS, and Azure Blob storage too) bucket to Snowflake, allowing Users to load into or unload data from Snowflake, or query the bucket contents directly. |
| Snowpipe | Schema-level | An object that automates loading of data from S3 (or GCS, and Azure Blob storage) into tables as soon as new files land in the bucket. |
| Stage | Schema-level | Location of data files (CSV, Parquet, etc.) in cloud storage. There are two types of stages: internal (Snowflake-managed cloud storage) and external (self-managed cloud storage). |
Privileges
Privileges are an essential concept in access control. They permit an individual operation or a sometimes a set of operations to be performed on an object.
For example, with a Snowflake Table, a User could have the privilege to SELECT data from it, INSERT rows into it, DELETE data from it, etc. In a Snowflake Database, a User could CREATE SCHEMA in it, or MONITOR it.
The table below briefly describes some of the key privileges that can be granted to key objects.
| Object | Object Privilege | Description |
|---|---|---|
| Database | USAGE | Enables using and viewing the database, but additional privileges are required to take any actions on it. |
| MONITOR | Enables running a DESCRIBE command. | |
| CREATE SCHEMA | Enables creating (or cloning) a schema in the database. | |
| IMPORTED PRIVILEGES | Only applies to shared databases, and enables other account roles to access the shared objects. For more on imported privileges, https://docs.snowflake.com/en/user-guide/data-share-consumers#option-1-objects-in-a-share-not-associated-with-a-database-role. | |
| Schema | USAGE | Enables seeing and using the schema, but still requires additional privileges on schema-level objects to see or execute commands on them. |
| MONITOR | Enables running a DESCRIBE command. | |
| CREATE TABLE / CREATE VIEW / CREATE STAGE / CREATE PIPE | / CREATE STAGE / CREATE PIPE Enables creating a table / view / stage / pipe in the schema. | |
| Table | SELECT | Enables querying the table to retrieve data. |
| INSERT | Enables inserting rows into the table. | |
| UPDATE | Enables updating existing data in the table. | |
| TRUNCATE | Enables deleting all data from the table. | |
| DELETE | Enables deleting all or a specific subset of rows from the the table. | |
| View | SELECT | Enables querying the table to retrieve data from the view (regardless of the view’s underlying tables and privileges granted on them). |
| Stage | USAGE | Enables using the external stage in a SQL statement. |
| READ | Enables running any command that reads the internal stage. (GET, LIST, COPY INTO) | |
| WRITE | Enables running any command that writes to the internal stage. (PUT, REMOVE, COPY INTO) |
You can find a complete list of available object privileges for Snowflake access control here.
With this list in mind, it will come in handy when auditing access to remember that privileges are granted on different levels depending on where an object is created (i.e. account-level, database-level, schema-level).
Ownership Privilege
Snowflake follows a Role-Based Access Control (RBAC) approach […]
👆The first sentence of this section was only partially true. Snowflake combines RBAC with a key concept from another access control model - Discretionary Access Control (DAC). In DAC, each object must have an owner.
In Snowflake’s implementation of DAC, each object is owned by the Role used to create it. A Role owning an object means that it has the OWNERSHIP privilege on it.
It’s important to understand that Users do not own objects, Roles do. Assuming all the Analysts in your data team have the same Role granted to them, this means that objects an Analyst creates will be owned by all the Analysts.
Note that the OWNERSHIP privilege on an object can be transferred to another Role. For example, you might want to transfer ownership of a table to a “more powerful” role in order to limit who can grant other roles access to it.
Privileges On Future Objects
Sometimes, when initially configuring access control, objects might not exist yet. However, you know ahead of time that you will want a certain role to have access to them once they’re created. Snowflake allows us to be proactive by granting certain privileges on future objects.
For example, an ANALYST role can be granted the SELECT privilege on future tables in the GOLDEN_DB database, or on future tables in a specific schema. Check this Snowflake doc out for additional information about future object grants’ precedence.
Roles
You can think of Snowflake roles as keys. 🔑 You have a key to your home, another one for your car, and potentially one for the office. If you have a close neighbour, they might have a spare key to your home (in case of emergency). The keys to your home grant both you and your neighbour access to it.
Similarly, in Snowflake terms, a role granted to a user gives them access to various operations and objects. Here’s an illustration of how our organisational chart could map to Snowflake Roles.
Role Types
In Snowflake, there are three key types of Roles:
- account roles
- database roles
- instance roles
In addition, there are application roles, tied to Snowflake Native Applications, which is a fun topic that warrants its own post, and is beyond the scope of Snowflake Roles 101.
Account Role
The original Snowflake roles, Account Roles, are the standard roles that:
- can be granted privileges on all securable objects in the account,
- their names are unique on the Account level, and
- they can be granted to Users or other Account Roles.
Database Role
As their name suggests, a Database Role is tied to a specific Database, and:
- it can only be granted privileges specific to that database’s objects (schemas, tables, views, etc.),
- their names are unique to the Database they are created on,
- they can be granted to other Database Roles (within the same Database) and to Account Roles,
- they can not be granted directly to Users, and
- a Database Role has the
USAGEprivilege granted to its database by default.
Instance Role
Instance Roles are the least frequently used role type. They are tied to a Snowflake Class Instance, granted to Account Roles, enabling Users to run methods of the Class Instance.
At the time of writing, only Snowflake can create Classes. Read more about the available Snowflake Classes here.
Which type of Role should you use?
If you’re just starting out, Account Roles will take you a long way.
Things get interesting when you start thinking about database roles, and the potential they have in simplifying and standardizing your configuration, allowing the owner of a database to self-manage privileges on it, without having ACCOUNTADMIN.
In addition, if you’re dealing with Snowflake Shares to share your data, database roles make access control more easily configurable.
Role Hierarchy
Roles can also be granted to other Roles. Doing so creates a Role Hierarchy.
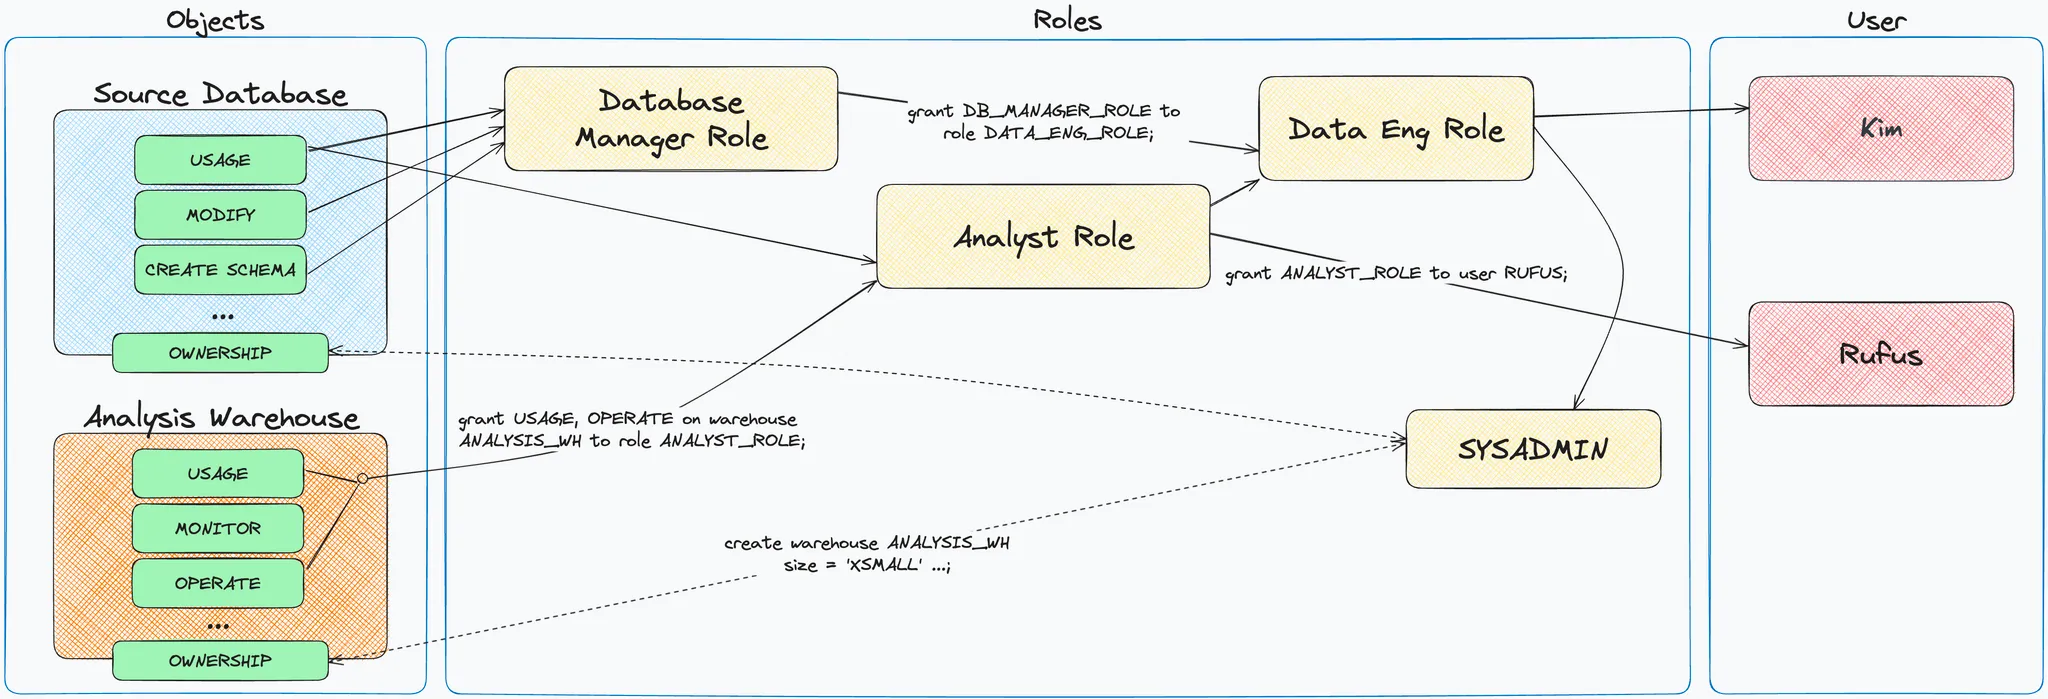
The simplest way of defining a Role hierarchy is through an example. With the role hierarchy below, Splinter, with his SYSADMIN role has the privileges superset of roles DATA_ENG_ROLE, ANALYST_ROLE, DB_MANAGER_ROLE, whereas Kim only has privileges of DATA_ENG_ROLE and DB_MANAGER_ROLE.
Default Snowflake Account Roles
When you create a Snowflake account and open the Admin / Users & Roles, you will see a set of *roles that Snowflake creates by default. These system-defined* roles can not be dropped, nor can the standard set of privileges each of them have be modified. They all have their intended purpose, namely:
ACCOUNTADMIN- The god-mode role that can do anything on the account-level. Be intentional with who you grant it to. Notice thatACCOUNTADMINrole inherits all the privileges thatSECURITYADMINandSYSADMINhave.SECURITYADMIN- This role has theMANAGE GRANTSaccount-level privilege granted to it, allowing it to grant (or revoke) grants on all objects in the account to (or from) other roles. Notice thatSECURITYADMINrole inherits all the privileges passed to it from theUSERADMINrole.USERADMIN- As its name suggests, this role is used for creating and managing users (with the help ofCREATE USERandCREATE ROLEaccount-level privileges.SYSADMIN- This role is allowed to create all objects in the account (including databases, warehouses, and other schema-level objects).PUBLIC- All users in the account are granted thePUBLICrole by default, but unless explicitly granted access to objects, it can not do much. Still, be very careful not to accidentally grant it privileges on important data, as all users in the account will be able to access it. Or, better yet, don’t grant any privileges toPUBLICrole. 😉
Finally, ORGADMIN deserves special attention. It is used for organisation-level operations, like creating more Snowflake accounts, and does not fit nicely in the default role hierarchy.
When creating custom roles and putting together a role hierarchy, Snowflake recommends for all the custom roles to ultimately be a descendant role of SYSADMIN
From our experience working on many Snowflake accounts, it is common to see the majority o database objects created and owned by ACCOUNTADMIN. This is a generally bad practice, suggesting there is little thought being put into access control, and a signal that ACCOUNTADMIN is used as a default role, which can lead to destructive mistakes like deleting data or users. We will cover some best practices of access control in Part II of the post series. 🙌
User Default Role
When connecting to Snowflake, a user establishes a session, which in most cases requires setting a role for it. If not specified, Snowflake will fall back on the user’s default role.
Secondary Roles
Secondary roles are a way to allow a use to leverage the access capabilities of multiple roles at once. Most Snowflake customers only use primary roles (a single role), but secondary roles are a powerful capability that can help prevent the need to combine multiple roles.
Similar to how you run the use role command to set your primary role in a given session, you can run the use secondary roles. The main difference is that this command accepts two options:
use secondary roles allactivates all roles a user has been granted access touse secondary roles nonedisables secondary roles.
Putting it all together
Alright, alright - “Show me some SQL!! 💢”, I hear you.
Let’s put the puzzle together by going through an end-to-end example of bootstrapping a fresh Snowflake account and enabling Kim and Rufus to use it in line with their needs.
In summary:
- We create Users, Roles and the Database.
- Privileges on securable objects are granted to Roles.
- Roles are connected into a hierarchy, creating privilege inheritance.
- Users get access to securable objects by being granted Roles.

This gets us to a configuration that:
- allows Kim to:
- create schemas in, and use the
SOURCE_DB - use and operate the
ANALYSIS_WH
- create schemas in, and use the
- allows Rufus to:
- use the
SOURCE_DB(If you’re wondering whether additional privileges on schemas and databases are missing — you are 💯 right, but they are left out for simplicity.) - use and operate the
ANALYSIS_WH
- use the
Although a very simple config, the above provides you with all the building blocks you need to implement your own RBAC model in Snowflake. In a follow-up, Part II post we will cover Snowflake RBAC best practices and provide you with some opinionated recommendations.
Frequently Asked Questions
Snowflake provides an incredibly intuitive SQL API, allowing you to create, update and delete pretty much anything via SQL commands. They are also actively expanding what you can do through their UI (Snowsight).
Most of the time, putting the action you want to take into words will be pretty close to what the actual SQL command for the action is.
Create a role
Check default role for a user

Set default role for a user
To update the user’s default role, you can run the following command:
Show roles in your account
Run a query using a different role
Grant ownership in Snowflake
Grant a role to a Snowflake user
Here’s an example of granting the SYSADMIN role to a user named IAN_WHITESTONE:
Grant user access to a warehouse
To allow a user to run queries on a Snowflake warehouse, you first grant the usage privilege on the warehouse to the role:
Then grant the role to that user:
Grant a role to another Snowflake role
As shown earlier in this post, you can also grant a role to another role, instead of a user.
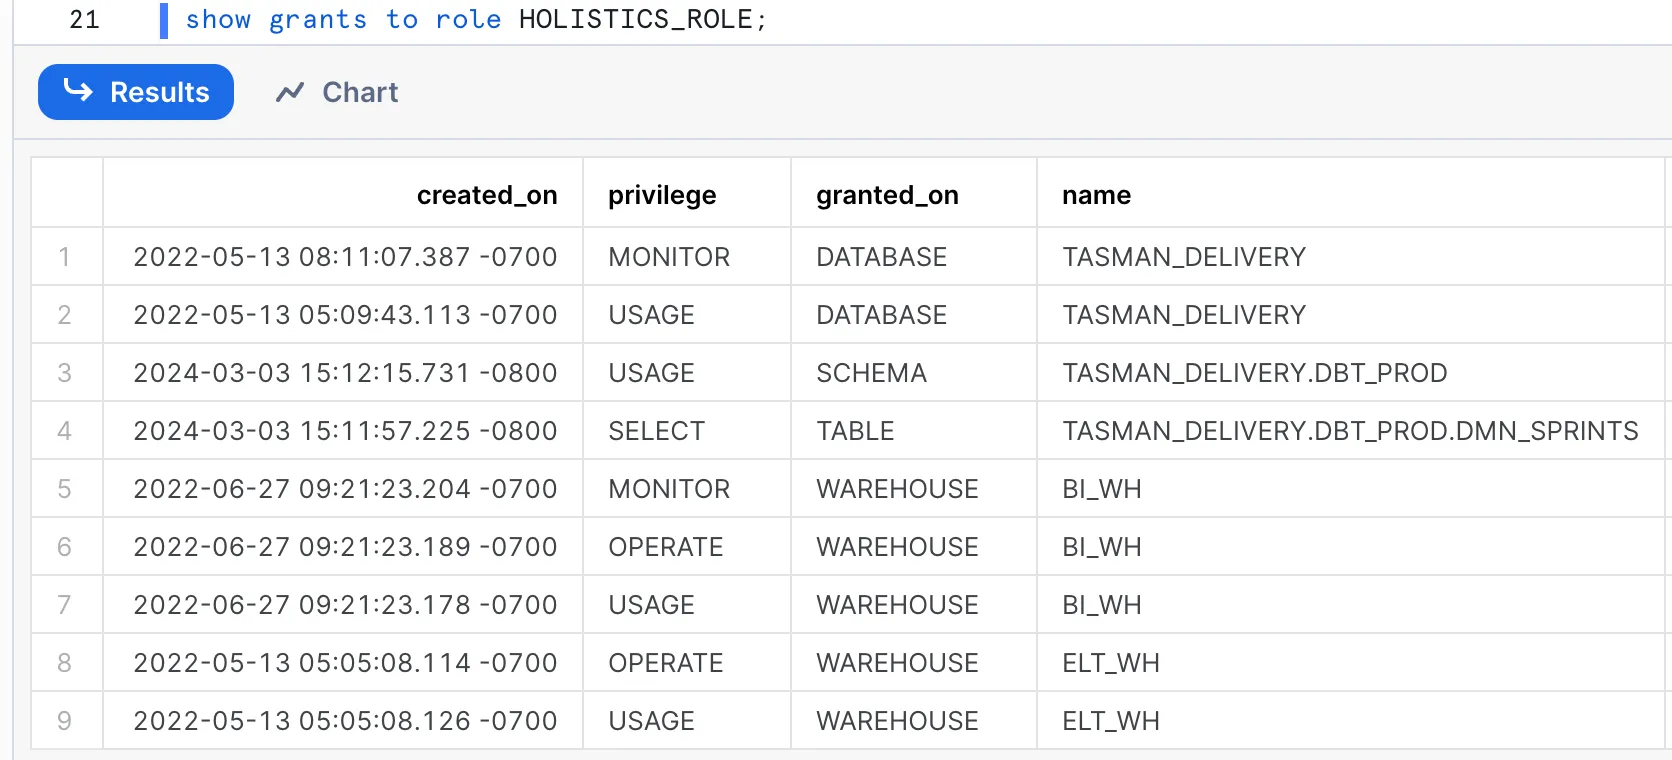
See which privileges a role has been granted
Note that when running the above query, your active Role either needs to be the Role you’re querying for, or any of its parent Roles in the hierarchy.
Show roles granted to user
Here’s an example to see all users which have been granted the ACCOUNTADMIN role:

Remove access to an object
The opposite of grant is revoke. This is how you revoke privileges from a role:
Audit a Snowflake user’s roles, grants and privileges
- Audit which Roles a User has been granted:

2. Now that you know which Roles a User can assume, you can dig into what privileges each of these roles have.

This approach can get tedious quickly, especially if there’s a complex role hierarchy in place. There are various resources and tools for auditing and managing access control, but this StackOverflow accepted answer is a great starting point. If you’re keen to move towards well managed access control, consider GitLab’s permifrost, which could provide you with queries you should run to get to a desired specification.
Grant select on all future tables in a schema and database
Note that there is a distinction between all and future objects. Granting a privilege on future objects will not grant the privilege on all existing objects, and vice versa.
allrefers to objects that exist when the query is runfutureonly refers to objects that are yet to be created
So, to grant select on all and future tables in a schema, you will need to run 2 queries - one for all and one for future tables (or other objects like views or schemas).
Who can see which users and roles exist, and which users have been granted which role?
Everyone. Every role, including the default PUBLIC role, allows the User to see all users and roles that exist in the account, as well as which roles have been granted to which users. However, not everyone can see which privileges are granted to roles.
About Tasman Analytics
Tasman is a boutique analytics consultancy transforming disorganised data into meaningful business value. We think businesses deserve data platforms that actually make a difference.
Our data expertise spans analytics, business intelligence, & data science. With offices in the UK and the Netherlands, we've been serving clients across Europe since 2017.
We base our work on three essential pillars:
- PEOPLE: We’ll teach our clients exactly what they need and how to build a high-performing data team. In the meantime, we’ll set up the right foundations for their data process, culture, and ways of working so your new team will begin with a head start.
- TECH: We’ll build a modern data stack to give our clients a single source of truth, tailored to their needs and based on industry best practices.
- INSIGHTS: We’ll help our clients define and interpret the metrics that matter so they can have a strategic view of their business. Once we know what works, we’ll create reliable reporting dashboards and self-service tools so they can prioritise, decide, and act faster with confidence.
Discover more about our approach and how we can accelerate your data journey via [email protected] or on our website at tasman.ai!

Jovan is currently deploying his resources at Tasman Analytics, enabling their clients to get to business value as quickly as possible by deploying scalable and proven data platforms. With over 20 clients under his Tasman belt, he has worked on a wide range of MDS tools, but is still most excited about Terraform-ing Snowflake accounts. Jovan enjoys establishing partnerships with products he believes in, like Metaplane, Prefect and, of course, SELECT
Want to hear about our latest Snowflake learnings?Subscribe to get notified.
Get up and running in less than 15 minutes
Connect your Snowflake account and instantly understand your savings potential.


