

A deep dive into Snowflake storage costs
Andrey BystrovWednesday, November 01, 2023
Snowflake's unique storage format allows users to store data in a highly efficient and cost effective manner. For most Snowflake customers, storage costs will typically make up <20% of their total spend. Despite that, there are often significant optimization opportunities users can leverage to reduce unnecessary usage.
In this blog post, we dive into Snowflake's storage cost structure & pricing, optimization techniques, and how to monitor costs. We do not cover Snowflake's external tables offering which allows users to store & query data outside of Snowflake.
Snowflake architecture recap
As discussed in our earlier post on Snowflake's architecture, Snowflake manages and scales storage and compute resources independently.
All tables in the storage layer leverage Snowflake's proprietary micro-partitions file format. Micro-partitions are small immutable data files (<16MB compressed) with metadata stored in the header. Because these files are immutable, updating a single row in a micro-partition requires an entire new micro-partition to be created. If done frequently and at scale, this can have significant cost implications as we'll discuss later in the post.
Although compute and storage are given the majority of attention, the Cloud Services layer also plays a key role in managing the metadata associated with each table, enabling notable storage features as Time Travel, Fail-Safe, and Zero Copy Cloning.
Snowflake storage concepts
As highlighted in the recent post on Snowflake merges, Snowflake's storage and cloud service decoupling has paved the way for the emergence of the table version concept. This means that each table is defined by an associated timestamp of creation, a set of linked micro-partitions, and pre-computed statistics for each micro-partition. In this way, a table could be thought of as a set of metadata pointers that define it.
The image below demonstrates this concept. Links between tables and the physical data (micro-partitions) are shown. Table A and Table B (a clone of A) both share the exact same partitions. Table C, also a clone, shares the same micro-partitions as well as a new one created by a data modification (i.e. an insertion of new records).
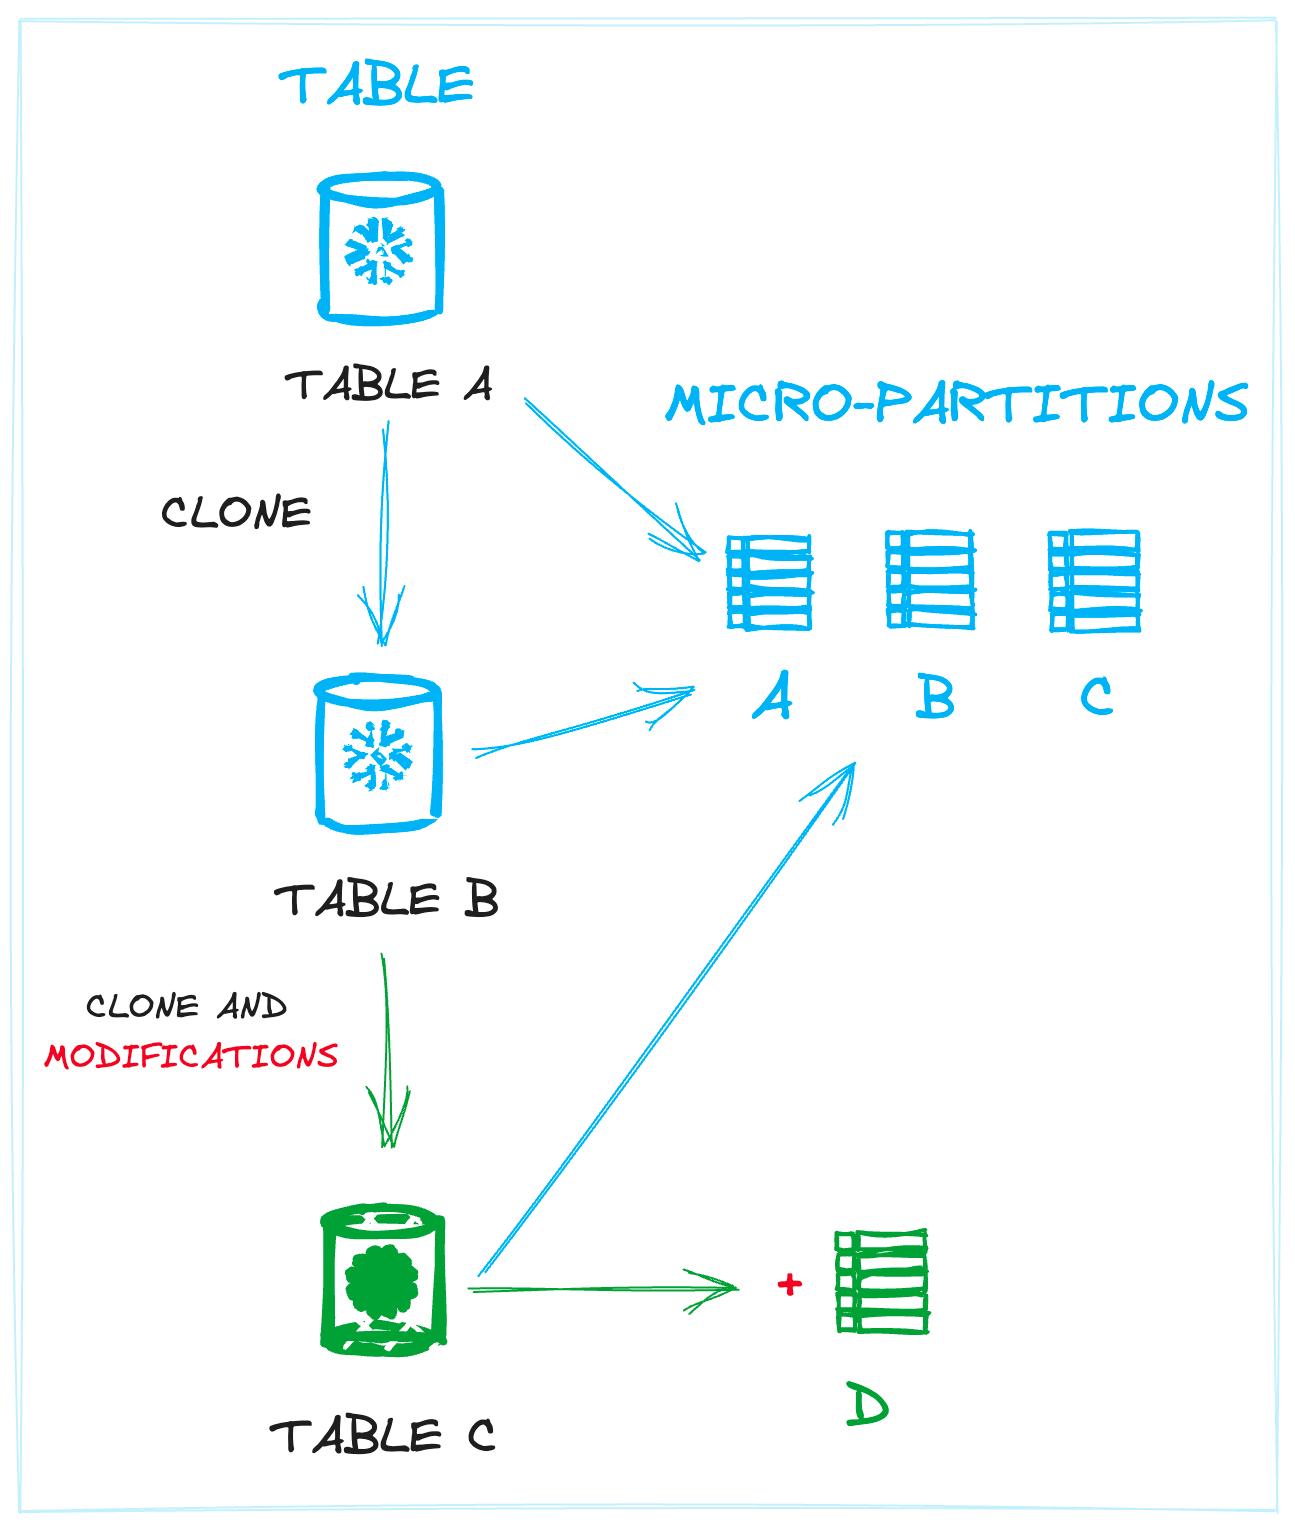
The concept of defining tables as a collection of micro-partitions helps Snowflake avoid unnecessary operations on disk, since new tables can be linked to a pre-existing micro-partitions wherever possible. This decoupling allows you to create multiple unique tables that share an identical set of physical files, which is the case when performing zero-copy cloning.
Snowflake's storage structure allows them to offer a variety of Continuous Data Protection (CDP) features, available for all customers. CDP consists of Time-Travel, Fail-Safe and Zero-Copy Cloning features, which we'll dive into next.
Time Travel
Time Travel, also referred to as "data retention", helps users protect their data. It's primary function is to back up data (more precisely, micro-partitions) for a specific period of time. As a secondary effect, it allows you to travel back in history to query, re-create or un-drop objects, using the data from a specific period in time.
Time Travel is set to 1 day by default and is available for all customers, regardless of their Snowflake edition. For Snowflake Standard edition, Time Travel can be set to 0 (disabled) or left at the default 1 day. For Snowflake Enterprise Edition, the retention period can be extended to 90 days for permanent objects. Transient and temporary tables are limited to a 1 day period for all customers.
Time travel can be configured using the DATA_RETENTION_TIME_IN_DAYS parameter. This is discussed in more detail later on in the optimization section.
Querying tables at a specific point in time
AT OR BEFORE is a syntax abstraction allowing users to travel into the past restoring data as it was on a given period of time. It has plenty of options to determine historical point, so please check out the official docs to find out how to correctly use these operators. Here's an example query:
Restoring a table you accidentally deleted
With Time Travel, dropping an important table, schema or database as a data engineering nightmare is no longer a problem. It can be easily restored if it's still in the retention period. You can find here some details on this functionality, but there's a quick example of how you can restore a hypothetical users table that was accidentally deleted:
Configuring Time Travel
Time Travel can be configured on different levels – account, database, schema or table. It follow hierarchical nesting, so in case it’s defined on a table level, then it gets prioritised over any settings made at the schema, database or account level.
DATA_RETENTION_TIME_IN_DAYS is the parameter responsible for Time Travel behaviour. To understand your time travel settings, start by understanding your account, database and schema level defaults.
Let's give it a try and manage retention config in our project:
As was said, explicit always takes over implicit, so if you need to control it for the particular object, then use the parameter in the create statement, otherwise let it be controlled by global config settings.
Fail Safe
Fail-Safe storage is the last line of defense. It is only accessible to Snowflake, and only comes into effect after the retention period. It's the last point in time before the data is completely removed and becomes inaccessible. It is not configurable and lasts for 7 days, unless it is a transient or temporary table, in which case Fail Safe will not be used at all.
Fail-Safe is intended as an absolute last resort. According to Snowflake's documentation:
Fail-safe is not provided as a means for accessing historical data after the Time Travel retention period has ended. It is for use only by Snowflake to recover data that may have been lost or damaged due to extreme operational failures.
Zero Copy Cloning
Zero-Copy Cloning allows you to create copy of objects in seconds regardless of their size. Cloning a table in Snowflake is not a database file creation operation that results in new data being stored on disk. Instead, it is just a metadata operation that happens in Cloud Services that defines a new object with pointers to the existing micro-partitions from the table being cloned.
Immediately after you clone a table, there are no new storage costs because both the parent and cloned table point to the exact same set of micro-partitions. However, if all records in the parent table were updated, then the storage costs would double because the cloned table will still point to the old micro-partitions files (that just got updated) and required them to stay around, incurring storage fees.
The Life Cycle of a Table in Snowflake
Now that we've introduced important storage concepts like Time Travel and Fail Safe, let’s illustrate how a permanent table moves through a default life cycle, highlighting the different time-travel and fail safe periods.
The image below demonstrates this process. We consider a permanent table with 10 Tb of data with the default 1 day Time Travel enabled and 7-day Fail Safe. A 10 day interval is shown, including the storage amounts that would be charged each day.
On Day 1, an operation is performed that updates every record in the table, which effectively causes every micro-partition to be re-created. All 10 Tb of the old micro-partitions enter into "Time Travel" storage, where users can still access the data for the next 24 hours.
On the next day, the 10 Tb of data has exited Time Travel and is now in Fail Safe storage for the next 7 days.

The key takeaway here is that despite the fact that the amount of data being stored in the table is not changing, the average daily storage consumption over the 10-day period has increased to 18 Tb.
SQL example
If you're interested in validating this behaviour yourself, you can leverage the SQL below:
Day 0: all modified table versions are moved to Time Travel, active table size remains the same

Day 1-8 Time Travel is over and the data is moved to Fail Safe

Summary & Implications
The underlying micro-partitions in each Snowflake table can be considered "active", "time-travelling" or in "fail safe". Write operations on the table trigger a "new table version" to be created under the hood, which causes the old micro-partitions associated with the previous table version to move through the time travel and fail-safe periods.
As shown above, modifying a large number of records or frequently updating a small number of records in a permanent table can result in significantly higher storage costs as the outdated micro-partitions must be cycled through time travel and fail safe storage before being completely removed.
How does Snowflake charge for storage?
Snowflake charges you proportionally to the amount of data you have stored. Customers are charged for the average daily compressed data (Tb) stored in their account, on a monthly basis. Stored data comes from four main sources:
- Files in internal Snowflake stages (compressed / uncompressed)
- Tables across databases including the corresponding Time Travel period
- Fail-Safe storage for permanent tables
- Сloned tables that reference files from a table that has since been modified
As discussed in the prior Snowflake architecture post, Snowflake stores your data in the storage service of the underlying cloud provider (S3 for AWS, Blob for Azure, etc.). Snowflake essentially does pass through pricing here, meaning they are charging you whatever the underlying cloud provider charges them to store the data. Users do not pay a premium beyond what they would normally pay.
With Snowflake’s proprietary micro-partition file format, they can achieve compression ratios of at least 3:1, making storing storage costs significantly cheaper than storing the data yourself.
How much is Snowflake storage per terabyte?
The price per terabyte for Snowflake varies depending on whether you use Snowflake on-demand or have paid for capacity upfront. For instance, AWS located in US East (Northern Virginia) will cost you $40/Tb on demand and $23/Tb for pre-purchased capacity. In reality, there is a slight price differences across regions and platforms caused by multi-region architecture of cloud providers resulting into pass-through pricing, with the Pacific and South America being the most expensive on average. You can check out storage price plans here.
How to estimate monthly storage expenses?
To show how to calculate storage expenses, let's consider a storage volume slowly growing over a 30 day period. Here is a rough estimation of costs:
By moving from on-demand to a paid contract, you can immediately reduce your storage costs by 74% in this example on AWS in US East!
Frequent modifications and storage cost pitfalls
Frequent data changes can cause a sudden shift in storage costs, even though the active data volume remains the same. As soon as a table update is done, the old table version moves to the retention period and is replaced by the one that is now active. Hourly or more frequent updates that affect a major share of micro-partitions significantly increase your storage cost. Let's look at an extreme case to demonstrate potential sources of unnecessary costs.
Suppose we have Tb of permanent tables that are fully updated 3 times a day. We have the default Time Travel and Fail Safe periods set to 1 and 7 days, respectively.
How does this affect storage daily bytes size and, consequently, the total cost?
Even though we own only 1Tb of active storage, our table is consuming, and consequently being billed for 25 Tb of storage! If you're using a service like Automatic Clustering which frequently creates new micro-partitions as it re-shuffles your data, this multiple can become even higher.
Wherever possible, avoid frequent table updates which affect a large number of micro-partitions in permanent tables. If you cannot, considering using transient tables or reducing your Time Travel (retention) period to avoid unnecessary costs. If your data is already backed up in cloud storage or another system, do you need to pay for additional backup copies in Snowflake as well?
Optimizing and reducing storage costs
Now that we've built up a fundamental understanding of how data is stored in Snowflake and how you are charged, let's look at some ways you can optimize your storage costs and prevent any surprises from sudden spikes.
Minimize data retention periods
Reducing your data retention (time travel) period is an easy way to lower storage costs.
First and foremost, our strong recommendation is to disable Time-Travel (set it to 0) for all transient and temporary tables. These tables are regularly deleted and re-created, so there is no need for backing up their data for most use cases. If you have your data backed up elsewhere, also consider changing your permanent tables to transient tables to avoid spending unnecessarily on Fail Safe and Time Travel backups.
Second, keep your retention period for Time-Travel as low as you can. Do you need to be able to access deleted data 90 days later? Or can you just retain access for 7 days?
Minimize update frequency
We have illustrated the potential impact of high frequency updates on time travel and fail-safe behaviour, albeit in a rather exaggerated way. Regardless, frequent table updates, coupled with the default retention configuration, result in an enormous amount of data being stored. Storing multiple copies of the original records increases storage requirements by orders of magnitude.
Delete unused tables
The most obvious, but probably one of the most effective strategies, is to get rid of unnecessary data. We have all been in situations where data is loaded into the warehouse with future plans in mind, but remains untouched forever. Ian has how to identify unused tables in Snowflake in detail, so I highly recommend to check out this post to find out best ways to achieve it.
Use cloning with caution
As soon as a table has been cloned, there are no extra storage costs. However, if the original table gets deleted or updated, the cloned version will still hang on to the deleted/updated micro-partitions an
d incur storage costs.
When dropping a table, it is worth checking if any clones exist, and whether they should be dropped too. To achieve this, you can leverage the clone_group_id field in the table_storage_metrics view. This field reflects the relationship between original and cloned tables. For example, you can list all clones of a table with the following script:
How to monitor Snowflake storage costs?
Snowflake customers have access to a number of system views that cover various aspects of account usage and Snowflake objects. These views are located in the account_usage schema.
Monitoring table storage costs
The table_storage_metrics view can be queried to find out your storage costs per table. Each table’s current state, bytes size, cloning status, schema, table type and much more are available for end user. The table can be used to break down and individually track active, time-travelling, fail-safe or retained cloned bytes, as demonstrated earlier in the post.
Ian has previously explained how the identification of unused tables, coupled with the storage costs from table_storage_metrics, plays a big role in identifying unnecessary storage costs.
Here's an example query showing how you can use table_storage_metrics:
Snapshotting table_storage_metrics
The table_storage_metrics view consists of current table usage records, so if you properly delete your table, the records will no longer be there. In order to monitor table storage metrics over time, users must snapshot the table on an hourly/daily cadence and then build custom logic on top of that.
Monitoring aggregate storage costs over time
Simplified approach that allow customers to track all data, including data used by internal stage. On the flipside, data granularity is limited to account level, so you’re unable to get more detailed reports.
Customers can use the storage_usage view to monitor daily storage costs at an account level. More details can be found here.
A more granular approach to understanding storage costs in your account is to use the database_storage_usage_history view which shows storage costs at the database level. It is worth noting that the internal stages consumption is omitted from this view. More details are available in the Snowflake documentation.

Andrey is an experienced data practitioner, currently working as an Analytics Engineer at Deliveroo. Andrey has a strong passion for data modelling and SQL optimization. He has a deep understanding of the Snowflake platform, and uses that knowledge to help his team build performant and cost effective data pipelines. Andrey is passionate about the topic, and regular shares his learnings back with the community.
Want to hear about our latest data cloud learnings?Subscribe to get notified.
Get up and running in less than 15 minutes
Connect your Snowflake, Databricks, or BigQuery account and instantly understand your savings potential.

