

Error Notifications for Snowflake Tasks
Tomáš SobotíkWednesday, September 27, 2023
Introduction
Snowflake Tasks are a feature which helps users automate database related operations and can be used for building complete and automated data pipelines. Tasks can be used to trigger simple SQL commands and can be scheduled to run at a certain time. You can connect tasks together and create a complex data pipeline represented as a DAG (Directed Acyclic Graph) with a single root task. When combined with features like Snowpipe, they can be used to create end to end data pipelines with loading and transformation functionality.
With any data pipeline, it is necessary to monitor it and react accordingly if the process begins erroring at any point.
In our previous post on Snowflake notifications & alerts, we showed how you can use Snowflake's native notification & alerting features to set up validation checks and receive email notifications based on the output of a SQL query. The main downsides of this approach are the effort required to create these notifications, and the fact you will not be immediately notified when the error occurs unless you are frequently running the SQL query to check the output, and consequently paying the associated compute costs!
Thankfully, there is a new Snowflake feature called "Error Notifications for Tasks" which can be used to automatically and immediately alert users of a Snowflake Task or Snowpipe failure. In this post, we'll explore how to create an error notification for Tasks / Snowpipe in Snowflake and connect it a Slack channel.
Error Notification Architecture
First, let’s draw the overall architecture for this integration and then go through each step in detail.

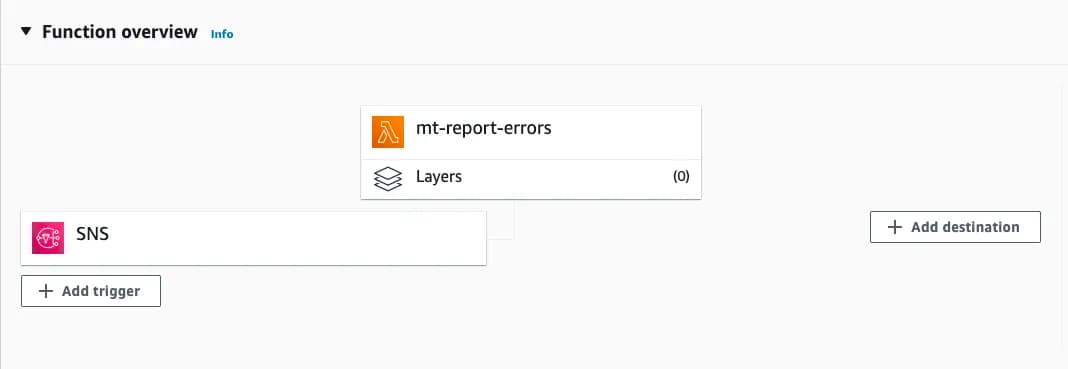
Suppose you have a DAG consisting of multiple tasks. You can assign a notification integration to the root task of the DAG. Then if any task from the DAG fails, the error notification will catch it and send a Simple Notification Service (SNS) message. We have Lambda function on AWS side which is triggered by an incoming SNS message. The Lambda function processes that message and sends it to your Slack channel via the Slack API. Your data team monitors the Slack channel and can respond accordingly.
Step 1: Create the AWS SNS topic
For the steps in this post, you will either need the help of your AWS admin(s) or have the proper privileges on AWS side to create and manage several AWS services. First, you need to create a SNS topic in AWS. You can follow the documentation from AWS for details instructions on how to do that.
Step 2: Create an AWS IAM Policy
Next, you'll need to create a new IAM policy that grants permissions to publish to that SNS topic. You need to define the sns:publish action to the SNS topic. Here are the steps:
- Go into Identity & Access Management (IAM) in AWS console:
- Choose Account settings from the left-hand navigation pane.
- Expand the Security Token Service Regions list, find the AWS region corresponding to the region where your account is located, and choose Activate if the status is Inactive.
- Choose Policies from the left-hand navigation pane.
- Click Create Policy.
- Click the JSON tab.
- Add a policy document that defines actions that can be taken on your SNS topic.
Step 3: Create an AWS IAM Role
As a last step on the AWS side we need to create an IAM role. If you already have in place a role which you use for your Snowflake account and AWS interaction you can of course reuse that and just add the policy created in the previous step. If you need to create a new IAM role here are the steps:
- Go to Identity & Access Management (IAM) in AWS:
- Choose Roles from the left-hand navigation pane.
- Click the Create role button.
- Select Another AWS account as the trusted entity type.
- In the Account ID field, enter your own AWS account ID temporarily.
- Select the Require external ID option. This option enables you to grant permissions on your Amazon account resources (i.e. SNS) to a third party (i.e. Snowflake).
- For now, enter a dummy ID such as 0000. Later, you will modify the trust relationship and replace the dummy ID with the external ID for the Snowflake IAM user generated for your account. A condition in the trust policy for your IAM role allows your Snowflake users to assume the role using the notification integration object you will create later.
- Click the Next button
- Locate the policy you created and select this policy.
- Click the Next button.
- Enter a name and description for the role, and click the Create role button.
- Record the Role ARN value located on the role summary page. You will specify this value in one or more later steps.
Step 4: Create the Snowflake Notification Integration
Next, we need to create a notification integration object in Snowflake, which will eventually get assigned to the root task in our sample DAG above.
When creating the notification integration, you will need the AWS ARN of the SNS topic and the IAM role you created earlier. Here is some example code:
Step 5: Grant Snowflake access to the SNS topic
Now we have to grant Snowflake access to the SNS topic. First, run DESC NOTIFICATION INTEGRATION my_notif_integration. We'll need to make note of the following two values from the output:
- SF_AWS_IAM_USER_ARN — ARN for the Snowflake IAM user created for your account.
- SF_AWS_EXTERNAL_ID — External ID for the Snowflake IAM user created for your account.
The final step of the configuration is a modification of the trust relationship in our IAM role. Go back to the AWS console, find your IAM role and click on tab Trust relationship. Click the Edit trust relationship button and modify the policy document with the values which we retrieved from describing your notification integration.
The integration between Snowflake and AWS is now complete!
Step 6: Update the Snowflake Task
Now we just need to assign this notification integration to our root task in the DAG. If you have not yet created a task, the assignment can be done directly as part of the CREATE TASK statement. I have had the root task already in place, so I am going to use ALTER TASK command:
ALTER TASK <name> SET ERROR_INTEGRATION = <integration_name>;
Step 7: Triggering Slack Alerts from SNS
Now we need to somehow process the incoming SNS messages and send them to Slack. Let’s create a Lambda function for that task that leverages the Slack API for sending the messages. We are going to use our SNS topic as a Lambda function trigger. Lambda will be triggered anytime a new SNS message arrives.
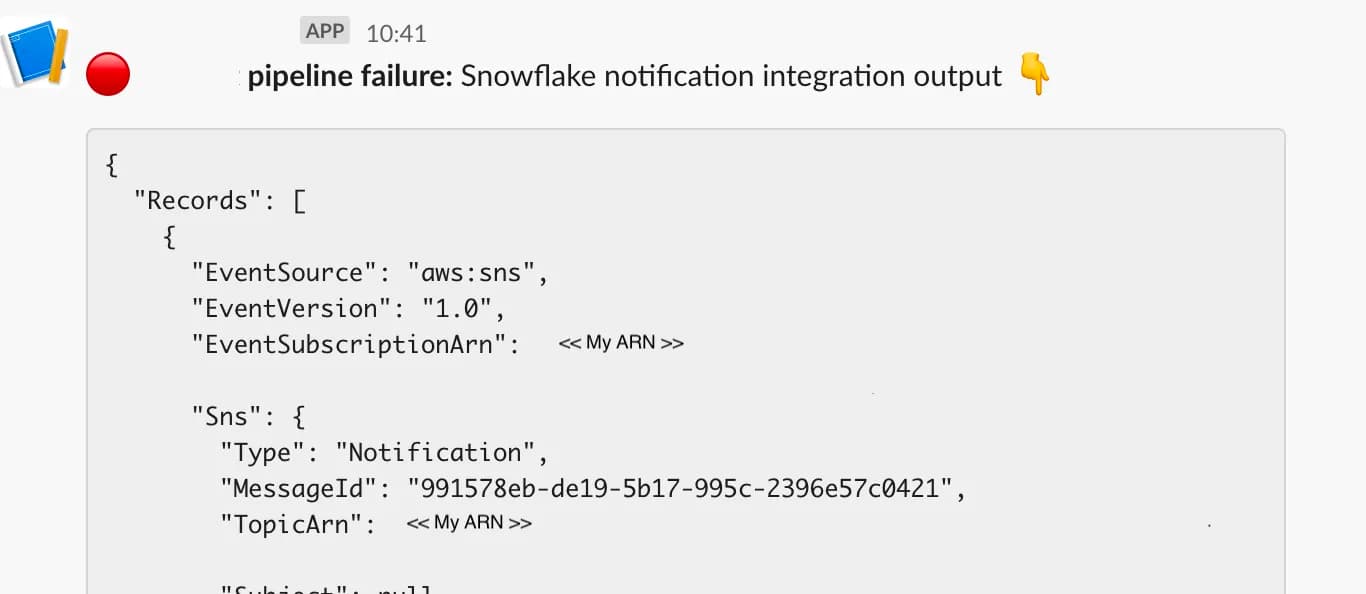
Here is an example JSON string Snowflake will send:
And the formatted version:
You can write your own logic to process the payload — use only relevant attributes, add other information which are not available, change the formatting, etc. For demonstration purposes let’s take the whole incoming message as is and send it to Slack.
First, let’s format the message a little bit, adding indentation to make it easier to read.
And now we connect to Slack and send the message:
And that’s it! Now we have a complete error notification pipeline between Snowflake Tasks and Slack by using a Snowflake Notification integration and a few AWS Services.
Error Notifications for Snowpipe
The exact same setup can be used to automatically receive notifications when a Snowpipe fails, just set the error_integration parameter when creating or altering your pipe object!

Tomas is a longstanding Snowflake Data SuperHero and general Snowflake subject matter expert. His extensive experience in the data world spans over a decade, during which he has served as a Snowflake data engineer, architect, and admin on various projects across diverse industries and technologies. Tomas is a core community member, actively sharing his expertise and inspiring others. He's also an O'Reilly instructor, leading live online training sessions.
Want to hear about our latest data cloud learnings?Subscribe to get notified.
Get up and running in less than 15 minutes
Connect your Snowflake, Databricks, or BigQuery account and instantly understand your savings potential.

