

3 Ways to Achieve Effective Clustering in Snowflake
Niall WoodwardSaturday, November 12, 2022
In our previous post on micro-partitions, we dove into how Snowflake's unique storage format enables a query optimization called pruning. Pairing query design with effective clustering can dramatically improve pruning and therefore query speeds. We'll explore how and when you should leverage this powerful Snowflake feature.
What is Snowflake clustering?
Clustering describes the distribution of data across micro-partitions, the unit of storage in Snowflake, for a particular table. When a table is well-clustered, Snowflake can leverage the metadata from each micro-partition to minimize the numbers of files the query must scan, greatly improving query performance. Due to this behaviour, clustering is one of the most powerful optimization techniques Snowflake users can use to improve performance and lower costs.
Let's explore this concept with an example.
Example of a well clustered table
In the diagram below, we have a hypothetical orders table that is well-clustered on the created_at column, as rows with similar created_at values are located in the same micro-partitions.
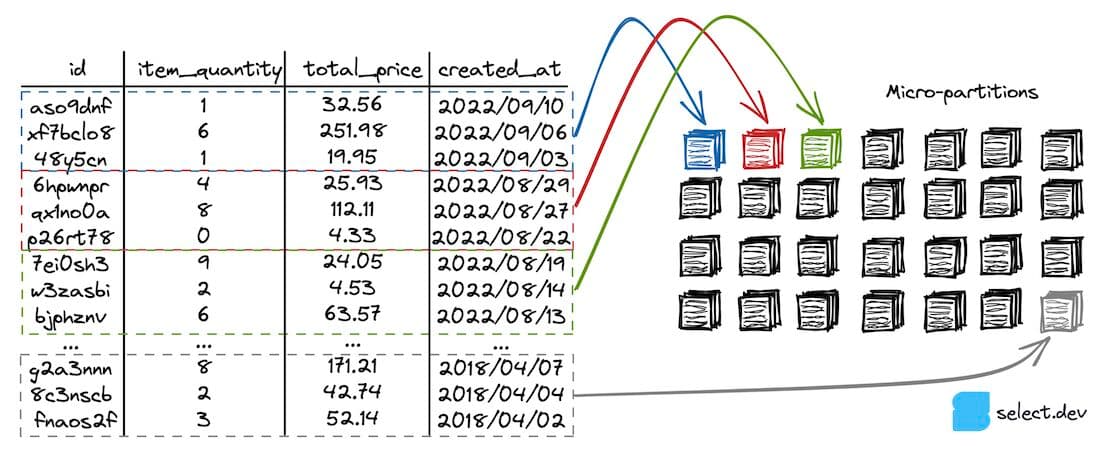
Snowflake maintains minimum and maximum value metadata for each column in each micro-partition. In this table, each micro-partition contains records for a narrow range of created_at values, so the table is well-clustered on the column. The following query only scans the first three micro-partitions highlighted, as Snowflake knows it can ignore the rest based on the where clause and minimum and maximum value micro-partition metadata. This behavior is called query pruning.
Unsurprisingly, the impact of scanning only three micro-partitions instead of every micro-partition is that the query runs considerably faster.
When should you use clustering?
Most Snowflake users don’t need to consider clustering. If your queries run fast enough and you’re comfortably under budget, then it’s really not worth worrying about. But, if you care about performance and/or cost, you definitely should care about clustering.
Pruning is arguably the most powerful optimization technique available to Snowflake users, as reducing the amount of data scanned and processed is such a fundamental principle in big data processing: “The fastest way to process data? Don’t.”
Snowflake’s documentation suggests that clustering is only beneficial for tables containing “multiple terabytes (TB) of data”. In our experience, however, clustering can have performance benefits for tables starting at hundreds of megabytes (MB).
Choosing a clustering key
To know whether a table is well-clustered for typical queries against it, you first have to know what those query patterns are. Snowflake's access_history view provides an easy way of retrieving historic queries for a particular table.
Frequently used where clause filtering keys are good choices for clustering keys. For example:
The above query will benefit from a table that is well-clustered on the created_at column, as similar values would be contained within the same micro-partition, resulting in only a small number of micro-partitions being scanned. This pruning determination is performed by the query compiler in the cloud services layer, prior to execution taking place.
In practice, we recommend starting by exploring the costliest queries in your account, which will likely highlight queries that prune micro-partitions ineffectively despite using filtering. These present opportunities to improve table clustering.
How to enable clustering in Snowflake?
Once you know what columns you want to cluster on, you'll need to choose a clustering method. We like to categorize the options into three.
1. Natural clustering
Suppose there is an ETL process adding new events to an events table each hour. A column inserted_at represents the time at which events are loaded into the table. Newly created micro-partitions will each have a tightly bound range of inserted_at values. This events table would be described to be naturally clustered on the inserted_at column. A query that filters this table on the inserted_at column will prune micro-partitions effectively.
When performing a backfill of a table that you'd like to leverage natural, insertion-order clustering on, make sure to sort the data by the natural clustering key first. That way the historic records are well-clustered, as well as the new ones that get inserted.
Pros
- No additional expenditure or effort required
Cons
- Only works for queries that filter on a column that correlates to the order in which data is inserted
2. Automatic clustering service
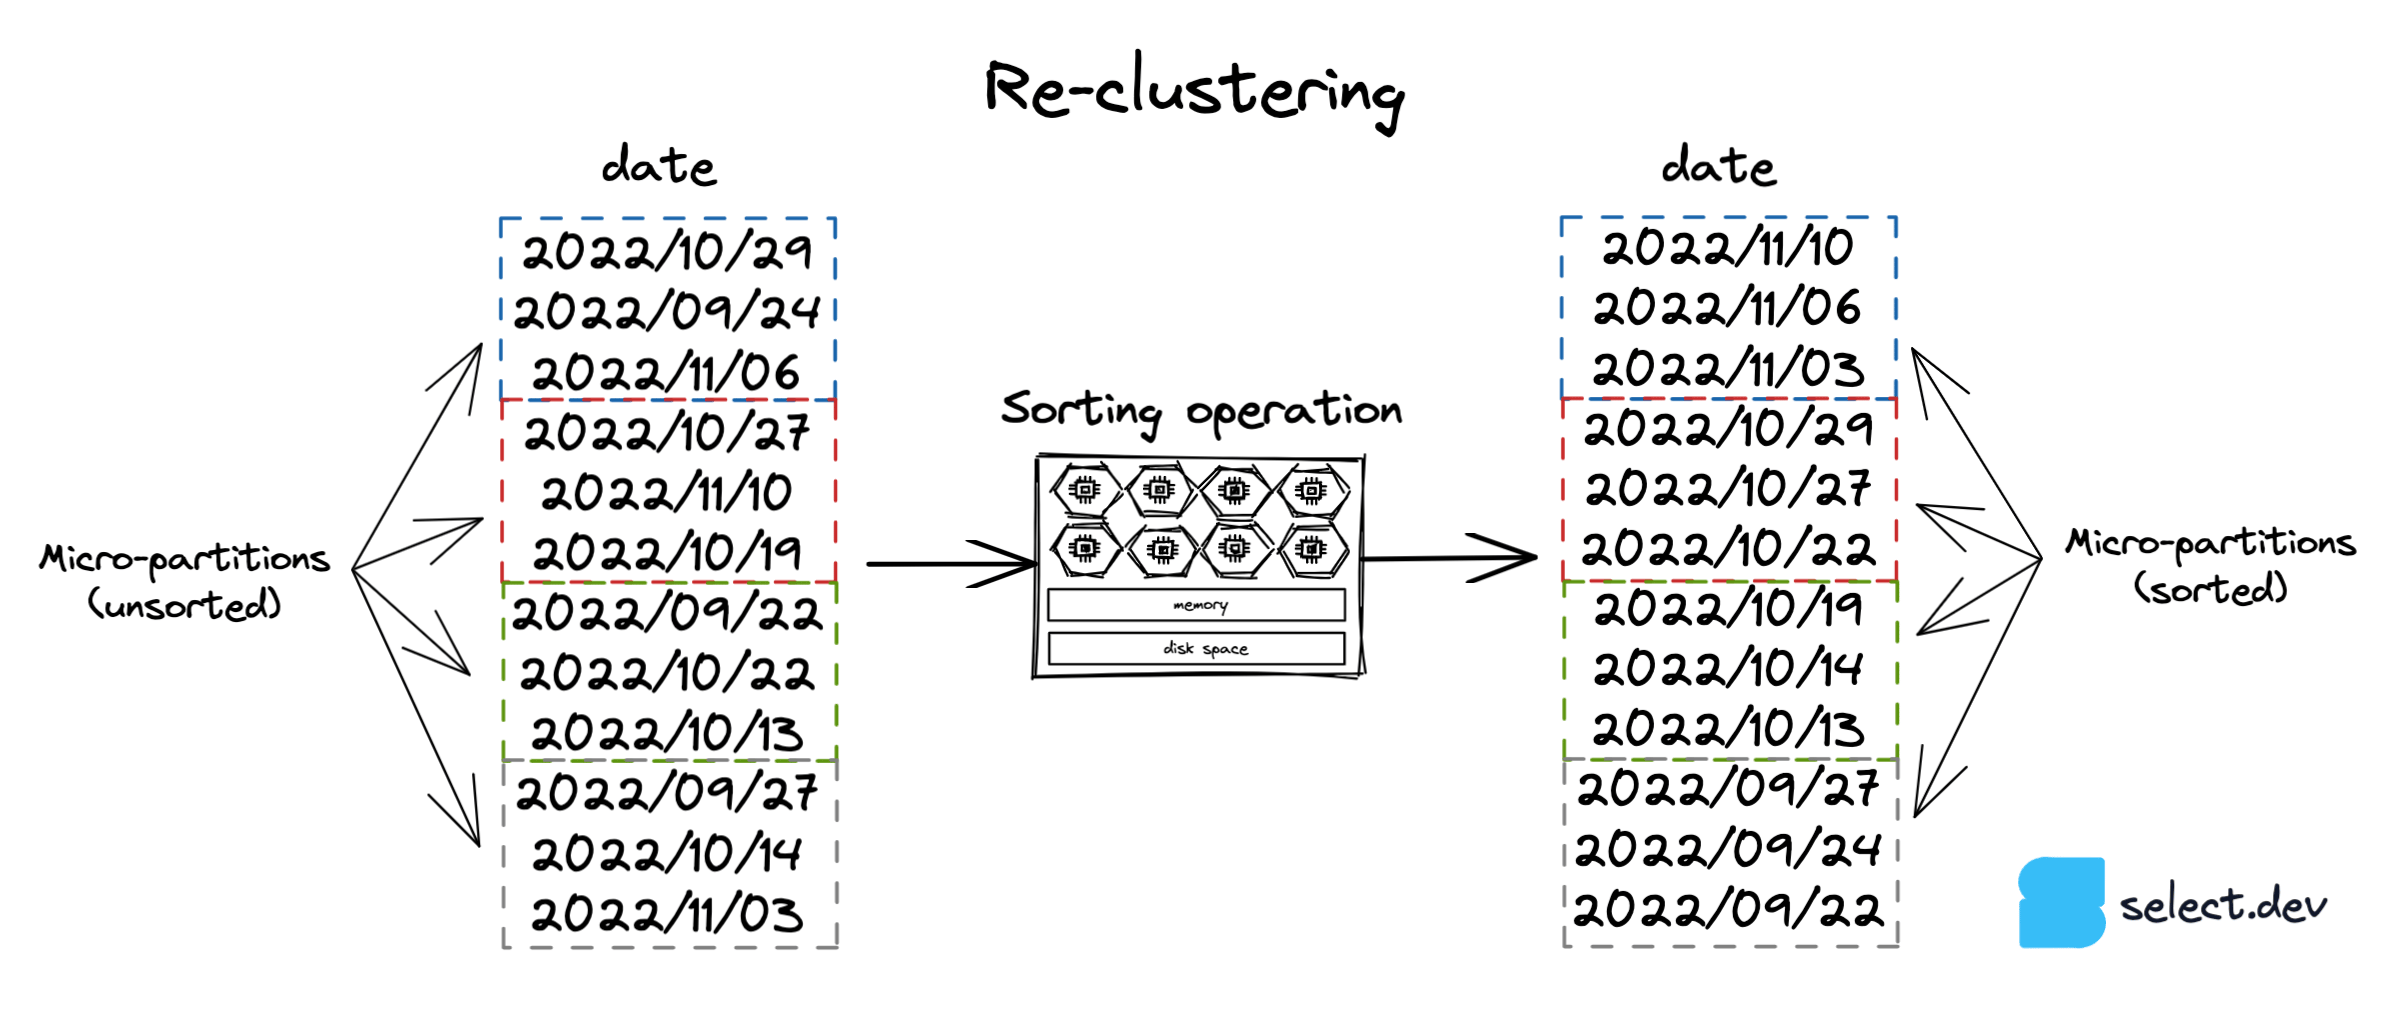
The automatic clustering service and option 3, manual sorting, involve sorting a table's data by a particular key. The sorting operation requires computation, which can either be performed by Snowflake with the automatic clustering service, or manually. The diagram below uses a date column to illustrate, but a table can be re-clustered by any expression/column.
The automatic clustering service uses Snowflake-managed compute resources to perform the re-clustering operation. This service only runs if a 'clustering key' has been set for a table:
The automatic clustering service performs work in the background to create and destroy micro-partitions so they contain tightly bound ranges of records based on the specified clustering key. This service is charged based on how much work Snowflake performs, which depends on the clustering key, the size of the table and how frequently its contents are modified. Consequently, tables that are frequently modified (inserts, updates, deletes) will incur higher automatic clustering costs. It's worth noting that the automatic clustering service only uses the first 5 bytes of a column when performing re-clustering. This means that column values with the same first few characters won't cause the service to perform any re-clustering.
The automatic clustering service is simple to use, but easy to spend money with. If you choose to use it, make sure to monitor both the cost and impact on queries on the table to determine if it achieves a good price/performance ratio. If you're interested in learning more about the automatic clustering service, check out this detailed post on the inner workings by one of Snowflake's engineers.
Pros
- The lowest effort way to cluster on a different key to the natural key.
- Doesn't block or interfere with DML operations.
Cons
- Unpredictable costs.
- Snowflake takes a higher margin on automatic clustering than warehouse compute costs, which can make automatic clustering less cost-effective than manual re-sorting.
3. Manual sorting
With fully recreated tables
If a table is always fully recreated as part of a transformation/modeling process, the table can be perfectly clustered on any key by adding an order by statement to the create table as (CTAS) query:
In this scenario of a table that is always fully recreated, we recommend always using manual sorting over the automatic clustering service as the table will be well-clustered, and at a much lower cost than the automatic clustering service.
On existing tables
Manually re-sorting an existing table on a particular key simply replaces the table with a sorted version of itself. Let’s suppose we have a sales table with entries for lots of different stores, and most queries on the table always filter for a specific store. We can perform the following query to ensure that the table is well-clustered on the store_id:
As new sales are added to the table over time, the existing micro-partitions will remain well-clustered by store_id, but new micro-partitions will contain records for lots of different stores. That means that older micro-partitions will prune well, but new micro-partitions won't. Once performance decreases below acceptable levels, the manual re-sorting query can be run again to ensure that all the micro-partitions are well-clustered on store_id.
The benefit of manual re-sorting over the automatic clustering service is complete control over how frequently the table is re-clustered, and the associated spend. However, the danger of this approach is that any DML operations which occur on the table while the create or replace table operation is running will be undone. Manual re-sorting should only be used on tables with predictable or pausable DML patterns, where you can be sure that no DML operations will run while the re-sort is taking place.
Pros
- Provides complete control over the clustering process.
- Lowest cost way to achieve perfect clustering on any key.
Cons
- Higher effort than the automatic clustering service. Requires the user to either manually execute the sorting query or implement automated orchestration of the sorting query.
- Replacing an existing table with a sorted version of itself reverses any DML operations which run during the re-sort.
Which clustering strategy should you use and when?
Always aim to leverage natural clustering as by definition it requires no re-clustering of a table. Transformation processes that use incremental data processing to only process new/updated data should always use add an inserted_at or updated_at column for this reason, as these will be naturally clustered and produce efficient pruning.
It’s common to see that most queries for an organization filter by the same columns, such as region or store_id. If queries with common filtering patterns are causing full table scans, then depending on how the table is populated, consider using automatic clustering or manual re-sorting to cluster on the filtered column. If you’re not sure how you’d implement manual re-sorting or there's a risk of DML operations running during the re-sort, use the automatic clustering service.
Other good candidates for re-clustering are tables queried on a timestamp column which doesn't always correlate to when the data was inserted, so natural clustering can't be used. An example of this is an events table which is frequently queried on event_created_at or similar, but events can arrive late and so micro-partitions have time range overlap. Re-clustering the table on the event_created_at will ensure the queries prune well.
Regardless of the clustering approach chosen, it’s always a good idea to sort data by the desired clustering key before inserting into the table.
Closing
Ultimately, pruning is achieved with complementary query design and table clustering. The more data, the more powerful pruning is, with the potential to improve a query's performance by orders of magnitude.
We’ll go deeper on the topic of clustering in future posts, including the use of Snowflake’s system$clustering_information function to analyze clustering statistics. We'll also explore options for when a table needs to be well-clustered on more than one column, so be sure to subscribe to our mailing list below. Thanks for reading, and please get in touch via Twitter or email where we'd be happy to answer questions or discuss these topics in more detail.

Niall is the Co-Founder & CTO of SELECT, a SaaS Snowflake cost management and optimization platform. Prior to starting SELECT, Niall was a data engineer at Brooklyn Data Company and several startups. As an open-source enthusiast, he's also a maintainer of SQLFluff, and creator of three dbt packages: dbt_artifacts, dbt_snowflake_monitoring and dbt_query_tags.
Want to hear about our latest data cloud learnings?Subscribe to get notified.
Get up and running in less than 15 minutes
Connect your Snowflake, Databricks, or BigQuery account and instantly understand your savings potential.

