Connecting your Snowflake account to SELECT is an easy process:
- Step 1: You'll create a new Snowflake service user with read only access to your Snowflake metadata and a few other permissions.
- Step 2: You'll connect your Snowflake account to SELECT using the user's credentials.
Step 1: Create Snowflake Service User
As outlined in our security documentation, SELECT requires a new Snowflake service user to be created with read-only access to your Snowflake account metadata database.
1. Create key pair for service user
First, create a new key pair that will be used as the authentication method for the new user created by the script. See our guide on how to create the key pair.
2. Run the setup script
Now that we have created the user's key pair credentials, we can run the setup script.
The script below handles creating the new user, role and associated permissions used by SELECT.
The script has plenty of code comments to help you understand what is happening. You can refer to the setup script explanation section below for more details.
Please fill out the variable values in lines 1-22 and provide the public key on line 26.
3. Verify your account has access to organization_usage views
SELECT relies on a few views from the snowflake.organization_usage schema. For example, snowflake.organization_usage.rate_sheet_daily is used to look up your daily rate for each Snowflake service (i.e. your cost per credit for compute, cost per terabyte for storage, etc).
Please run the following SQL statement to check if your account has these views populated:
If records are returned, you're all set.
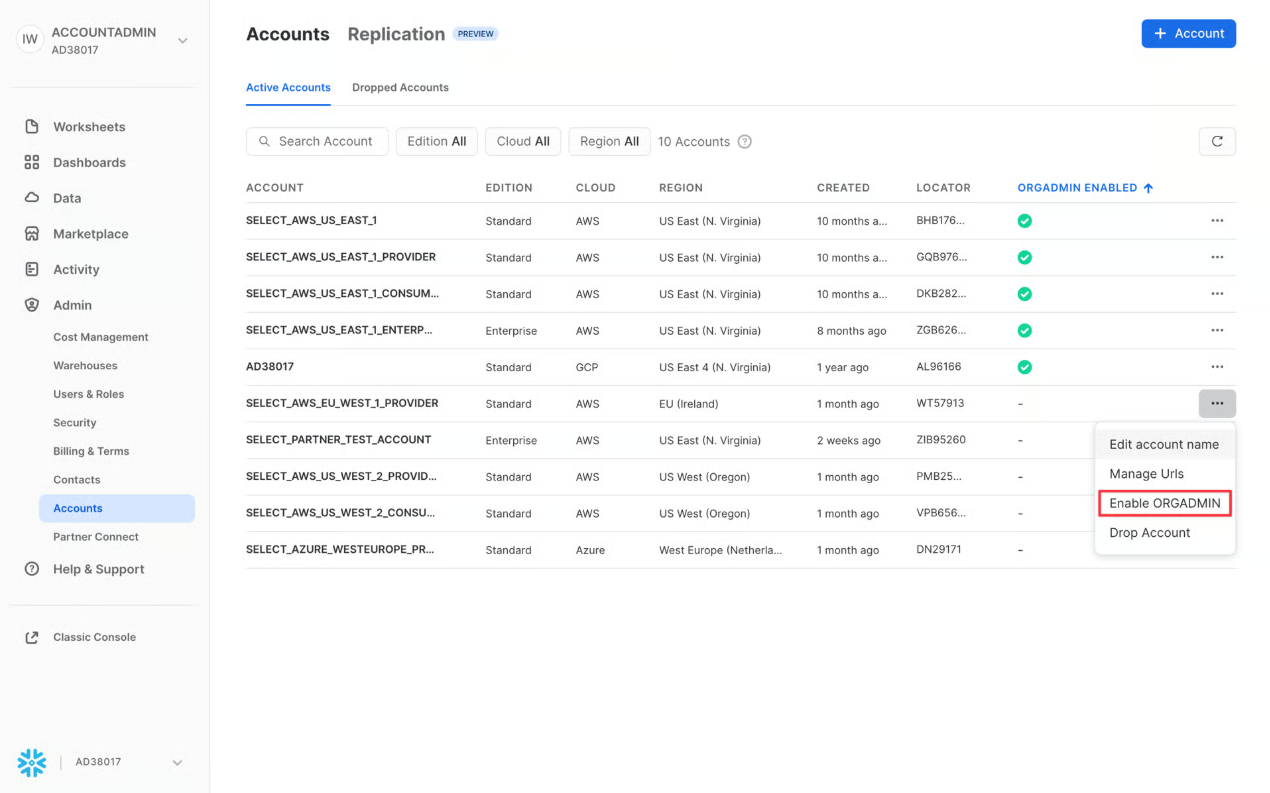
If no records are returned, the ORGADMIN role likely isn't enabled for the account. To enable it, log into a Snowflake account in your organization which has ORGADMIN enabled (at least one account will), then head to Admin -> Accounts in the sidebar. Then, enable ORGADMIN for the account you're connecting to SELECT.
It can take up to 1 day for these views to become populated with data after running this statement. As a result, you may not see data in your Snowflake account until the morning after connecting your account. Reach out to our team using the Intercom chat on the website if you're still not seeing data after 1 day.
Users who purchased their Snowflake contract/credits through a reseller (i.e. AWS Marketplace) will not have access to the organization_usage views even after running the command above. In this case, you can manually add your cost per credit and storage cost in the "Advanced" section of the "Add New Snowflake Account" screen.
4. [Optional] Update Network Policies
If your Snowflake account has configured a network policy to restrict access based on IP address, you'll need to update the network policy to allow SELECT to connect.
In Snowsight, go to Admin » Security » Network Policies. From there, add the following IP addresses to your Allowed IP Addresses list:
You can also apply the changes via SQL instead. The example below shows how to create the policy and assign it to the SELECT service user. Be sure to update the policy and user names as needed:
Updating an account wide network policy
If you're updating a network policy that is already active for all users in your Snowflake account, you do not need to reassign the policy to the SELECT user. Simply adding the new IPs is enough.
For more details, see the Snowflake documentation on Network Policies, or reach out using the chat button on the bottom right if you run into any issues.
Setup Script Explanation
In the sections below, we describe the setup script in more detail.
Create User, Role, and Warehouse
The first action taken by the script (after you set your variables) is to create a new user and role that will only be used by SELECT.
If you'd like SELECT to use an existing warehouse, set line 3 to an existing warehouse name. Otherwise, the warehouse indicated on line 3 will be created as an extra-small warehouse.
After the user, role, and warehouse are created:
- The role is granted read-only access to the Snowflake metadata database.
- The role is also grant ability to monitor warehouse settings through the manage warehouses permission. This permission is also required for SELECT to retrieve query statistics using get_query_operator_stats and for the Automated Savings feature.
Create a Storage Integration and Stage used by SELECT
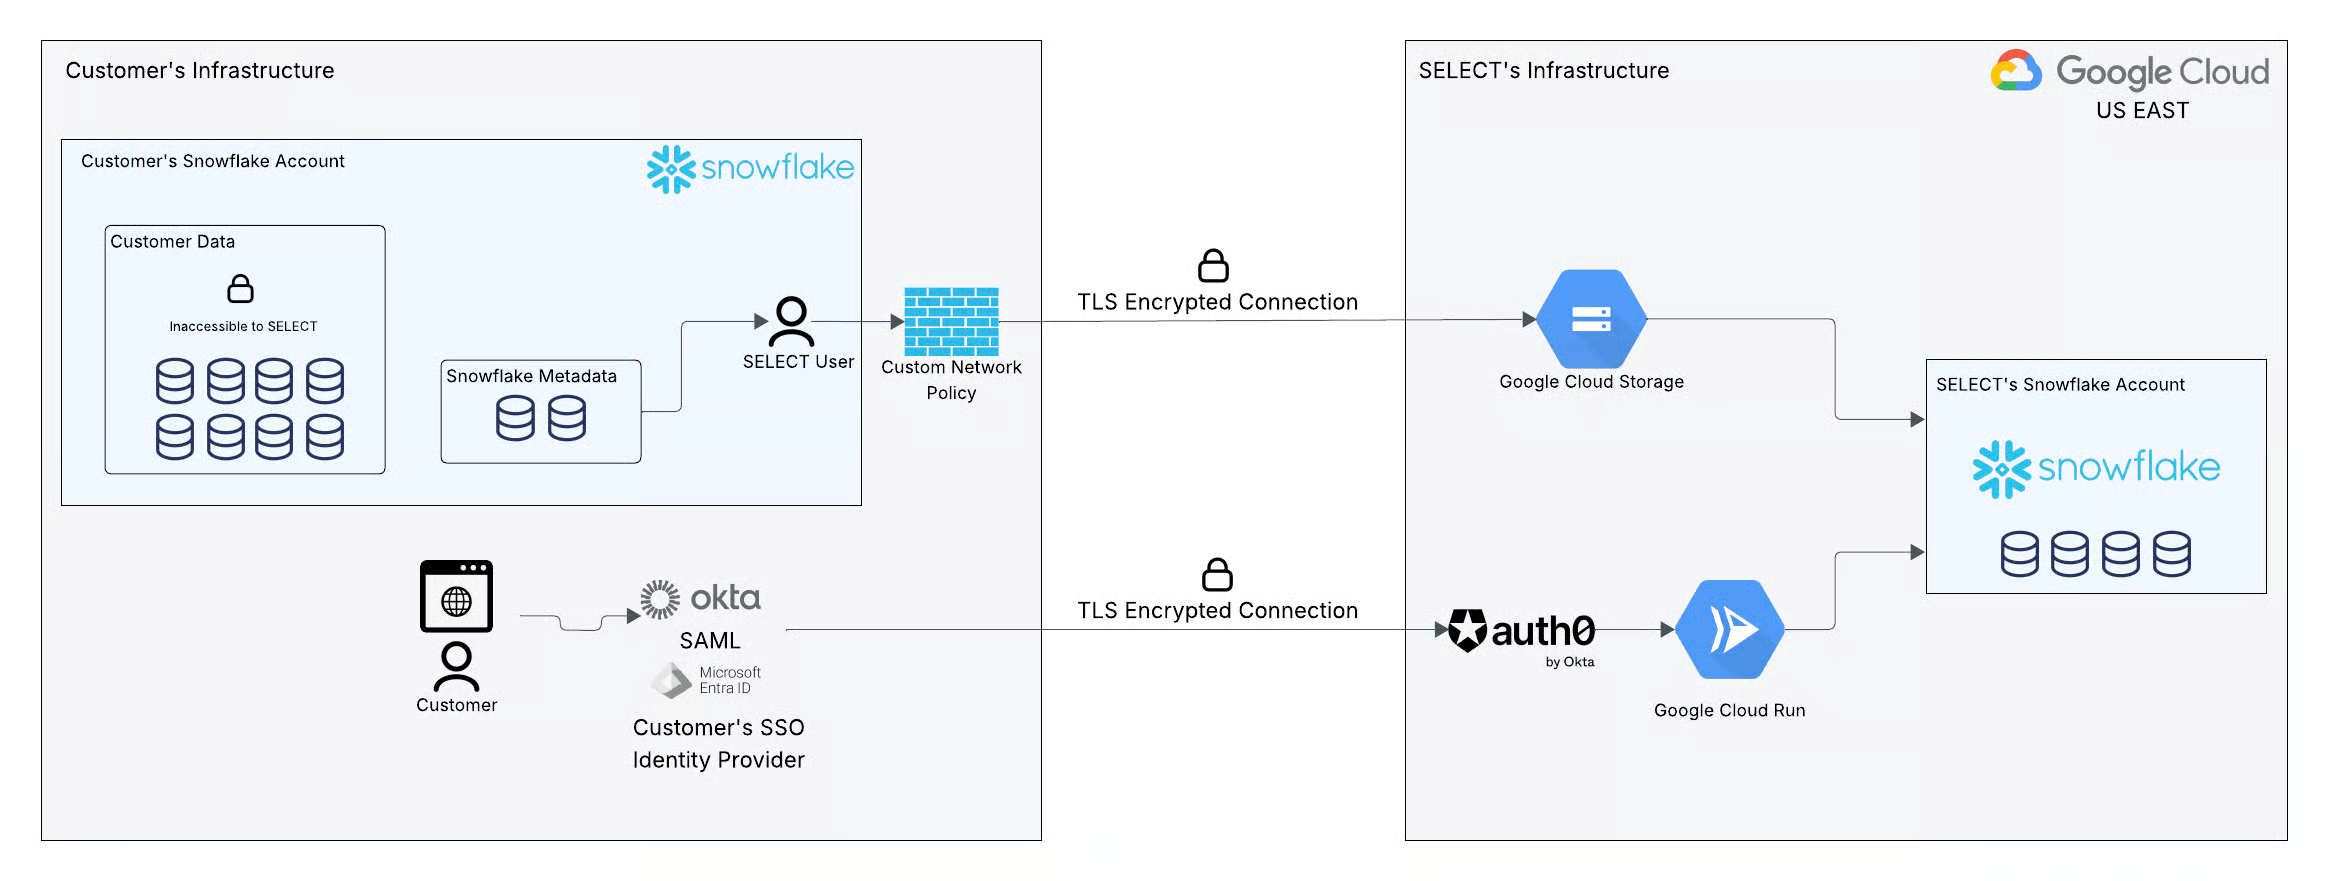
The script will create a stage and storage integration in your Snowflake account that will be used to give SELECT access to your Snowflake spend metadata. The bucket used in Google Cloud Storage will be created on the fly by SELECT when you connect your Snowflake account. There is nothing else you need to do to provide access.
Google Cloud Storage is used as an intermediary between SELECT's Snowflake account and the customer's. This is done because the Snowflake account usage views used by SELECT cannot be data shared directly, and the customer accounts may be in different regions which would require setting up data replication. Using Google Cloud Storage makes setup a lot simpler and more cost-effective for the customer.
As per our security documentation, each customer's Snowflake metadata is stored in a dedicated Google Cloud Storage bucket. Data is stored in the us-east-1 Google Cloud region. There is a data egress cost charged by Snowflake, but it's incredibly small for the metadata volumes we're processing (the highest we've seen across our customer base is $20 per year).
The image below shows how the Snowflake Metadata is unloaded to GCS in SELECT's infrastructure using this storage integration.
These objects will get created in the database and schema you specified on lines 18 & 19. If you used a new database / schema name, the database and Schema will be created at this time. If you used an existing database and Schema name, the SELECT role will be granted usage in the existing database and only the new objects will be created.
Create a Stored Procedure used by SELECT
Some features in SELECT require information about objects in your account by:
- Running a Describe Table statement in your Snowflake account to fetch additional metadata from columns in a particular object (table, view, materialized table, etc).
- Running Snowflake's system function system$clustering_information to fetch metadata about the clustering health status of columns in a table.
Instead of granting the necessary permissions to the select_user on all your existing objects and using future grants to also include new objects (which can conflict with your existing future grants), we ask our customers to create a custom stored procedure for when SELECT needs to run the commands above.
Just like above, these objects will be created in the database and schema specified on lines 18 and 19, but it needs to be created with the accountadmin role, as SELECT relies on the execute as owner property.
Step 2: Connect your Snowflake Account
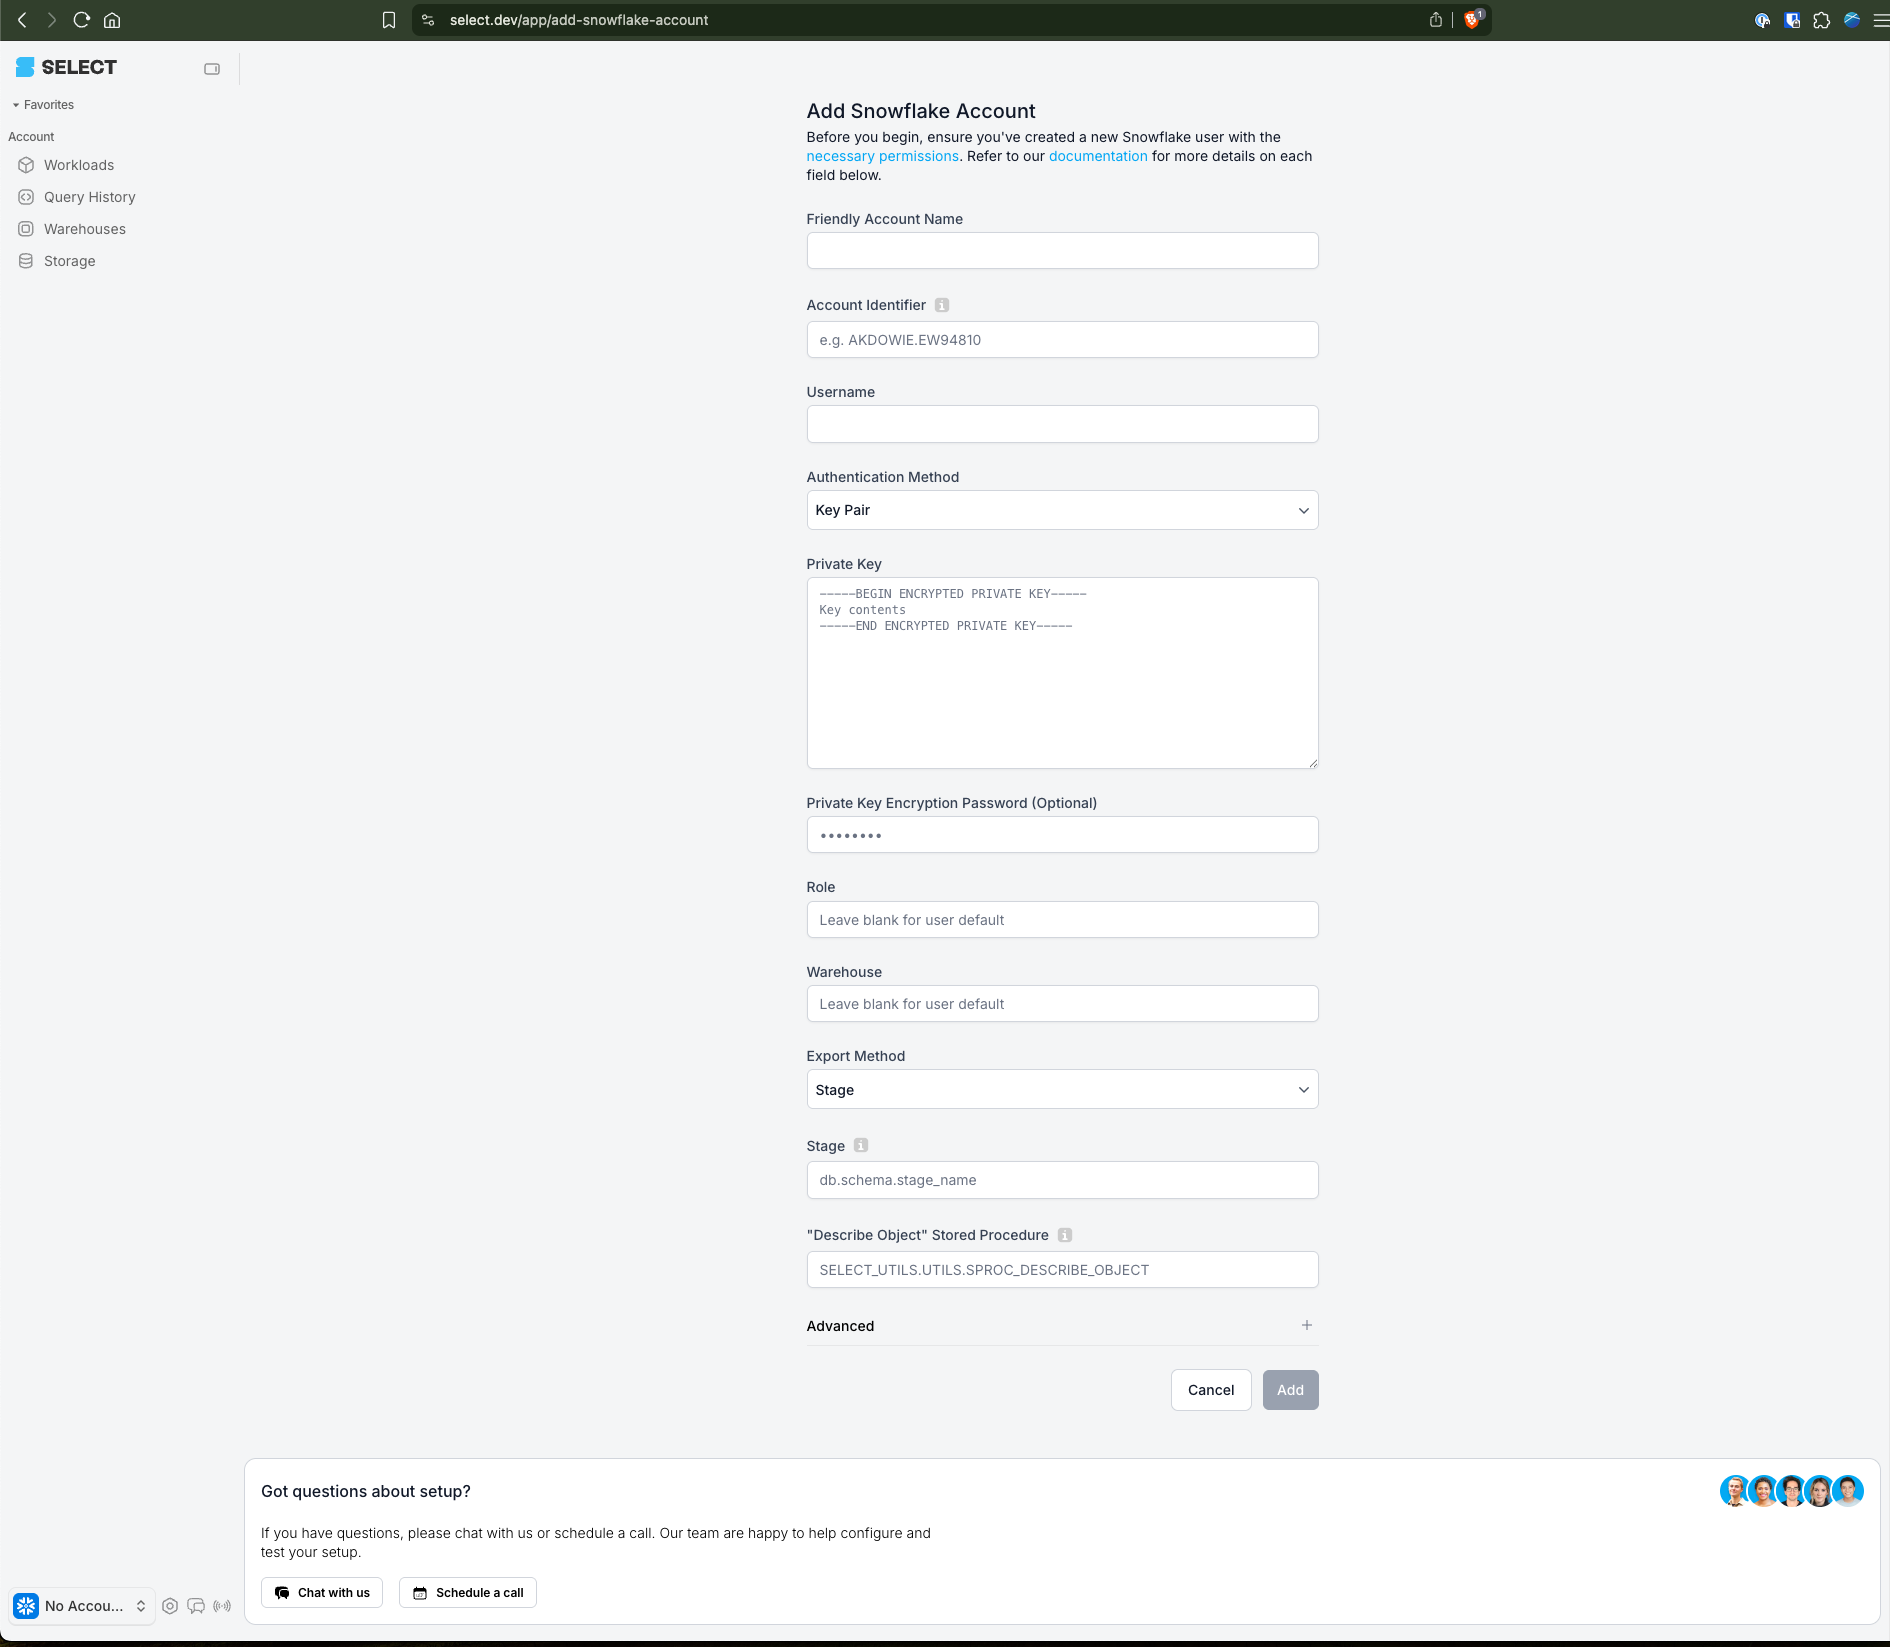
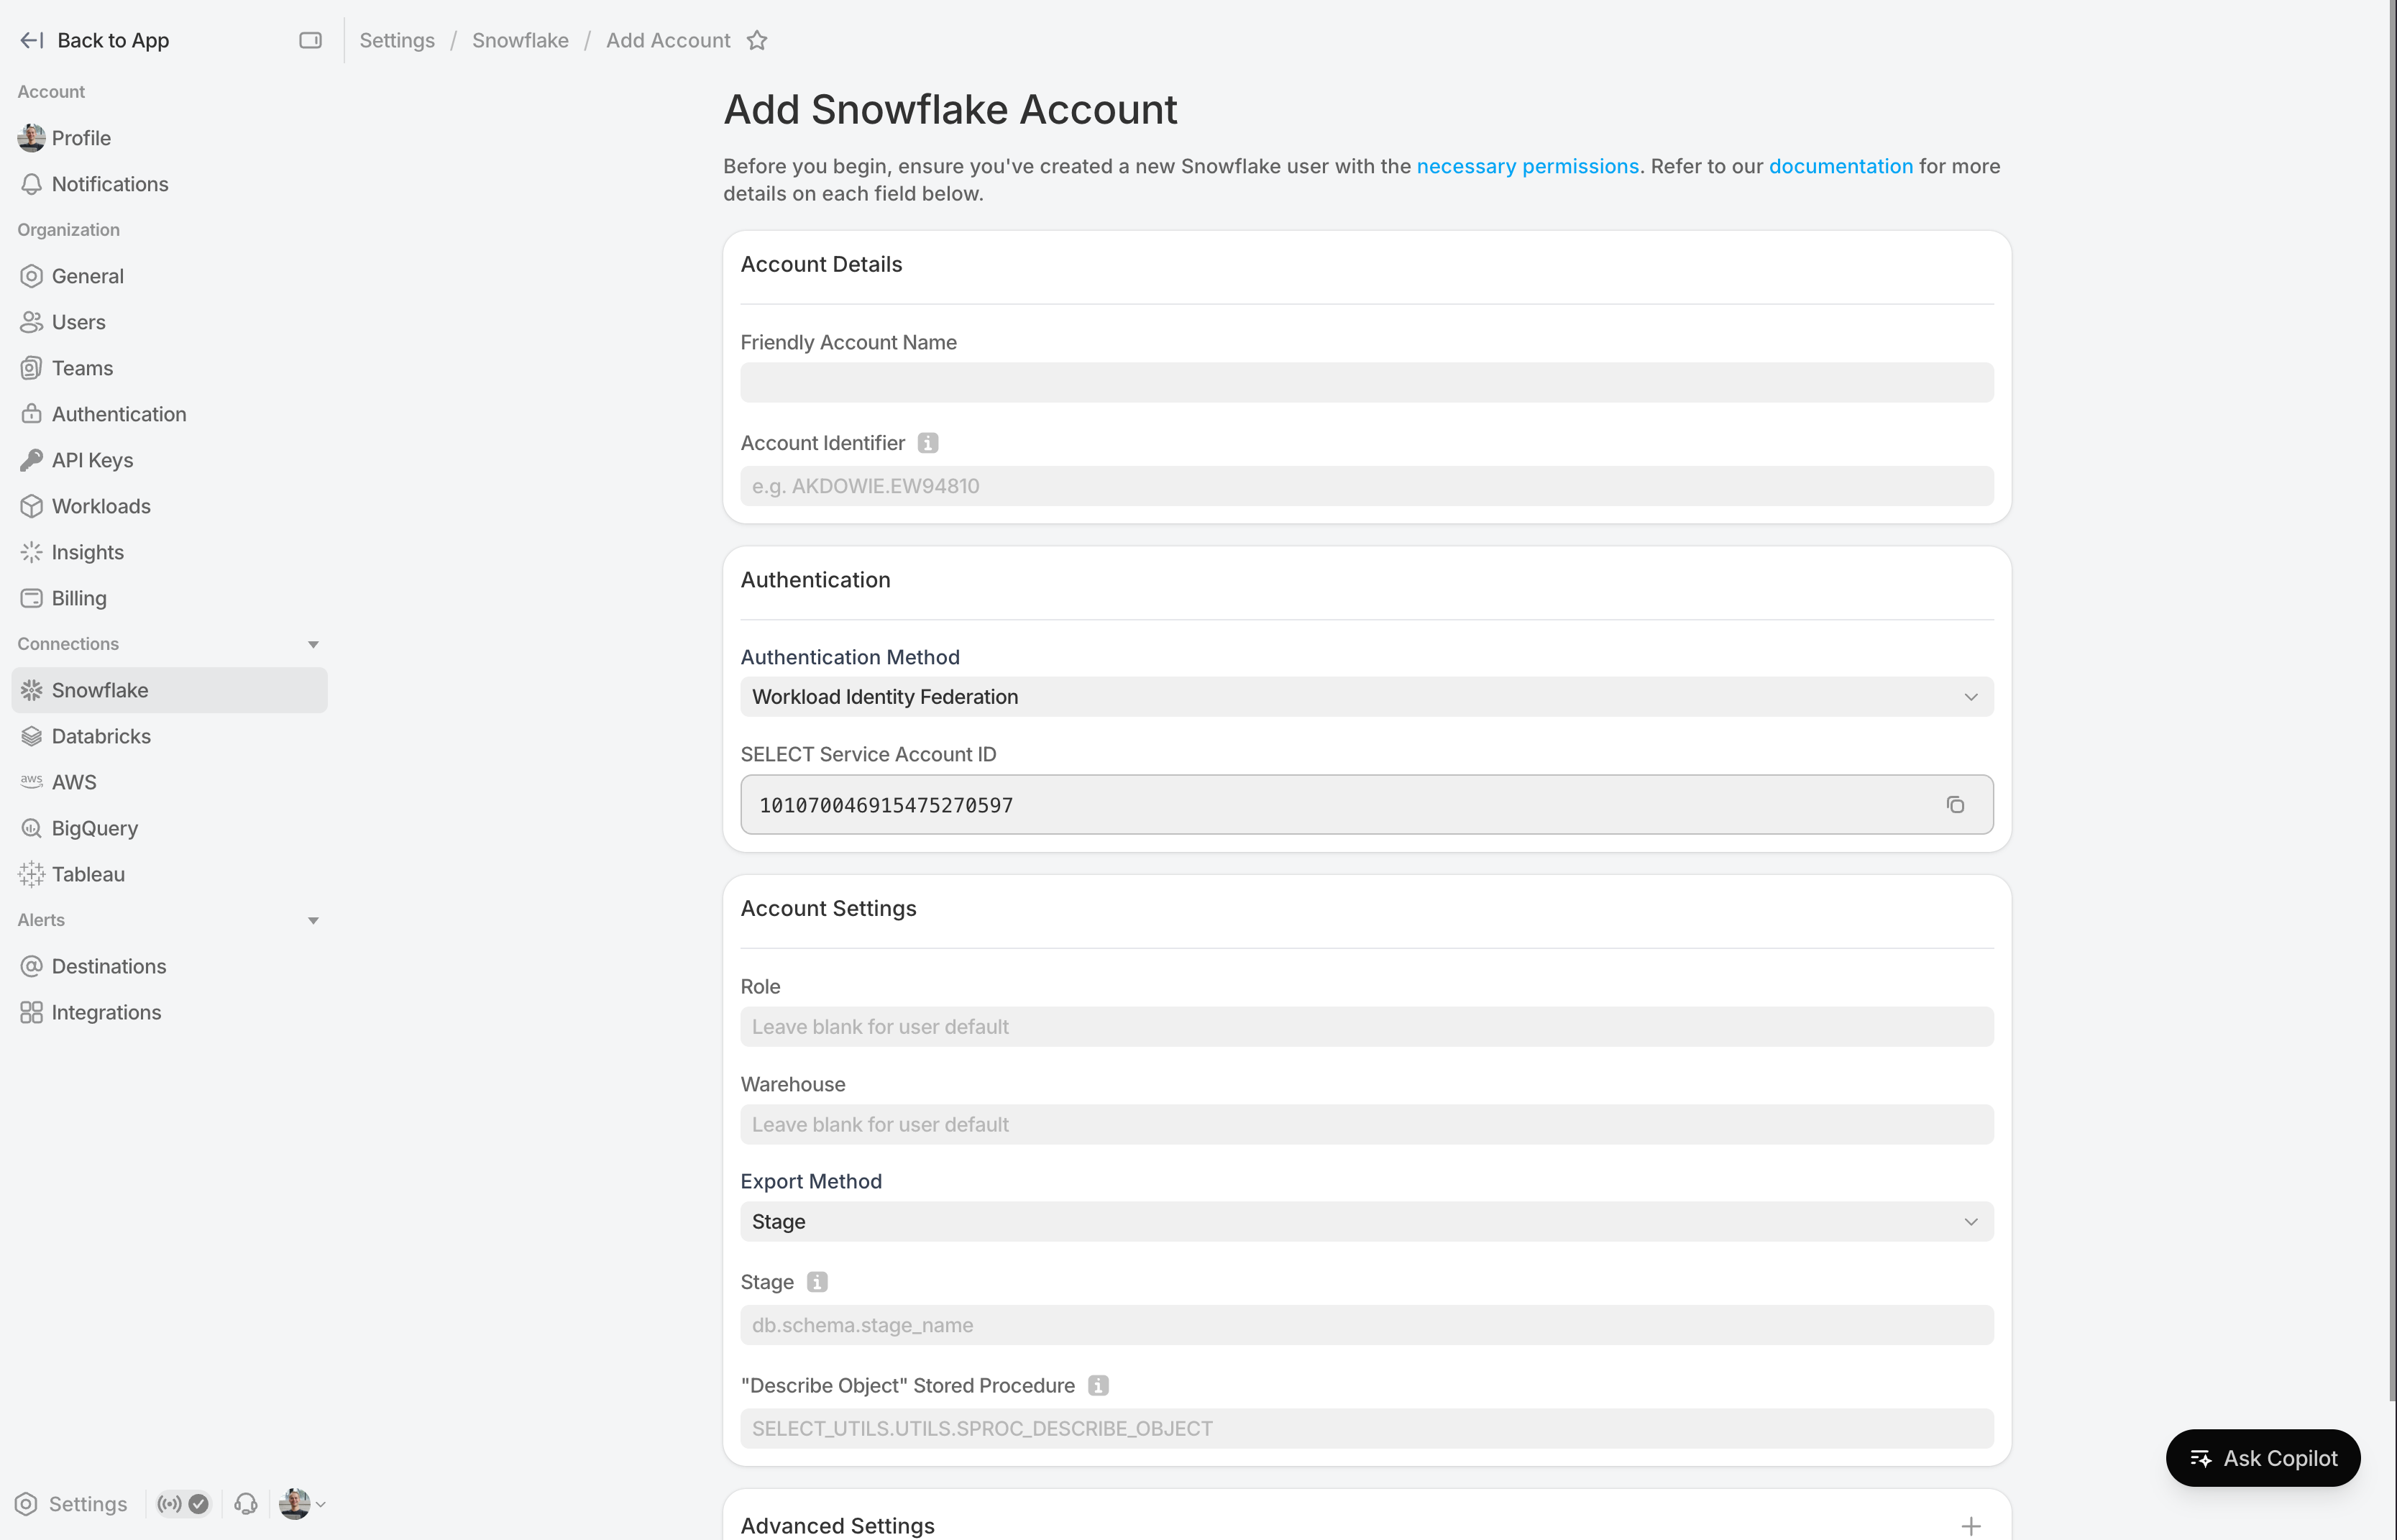
Now that we've created the new Snowflake user and associated resources, we can plug those details into the SELECT UI under Settings -> Accounts -> Add Snowflake account.
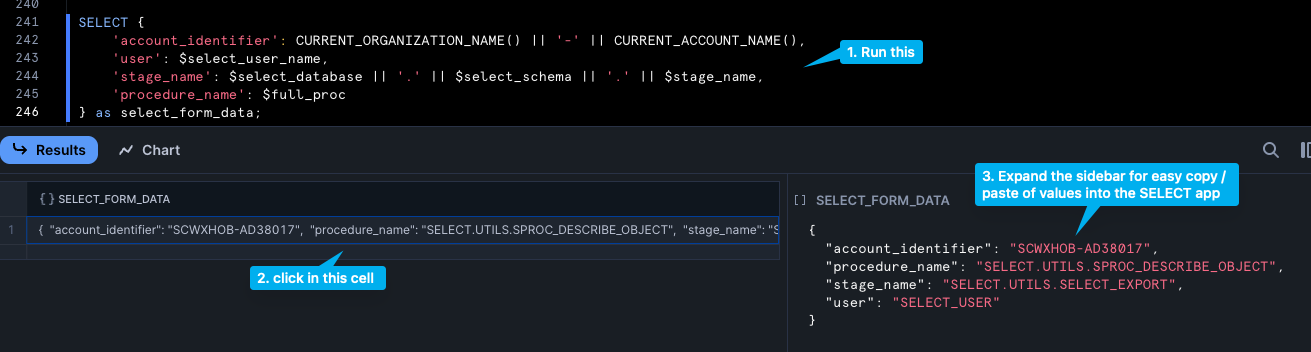
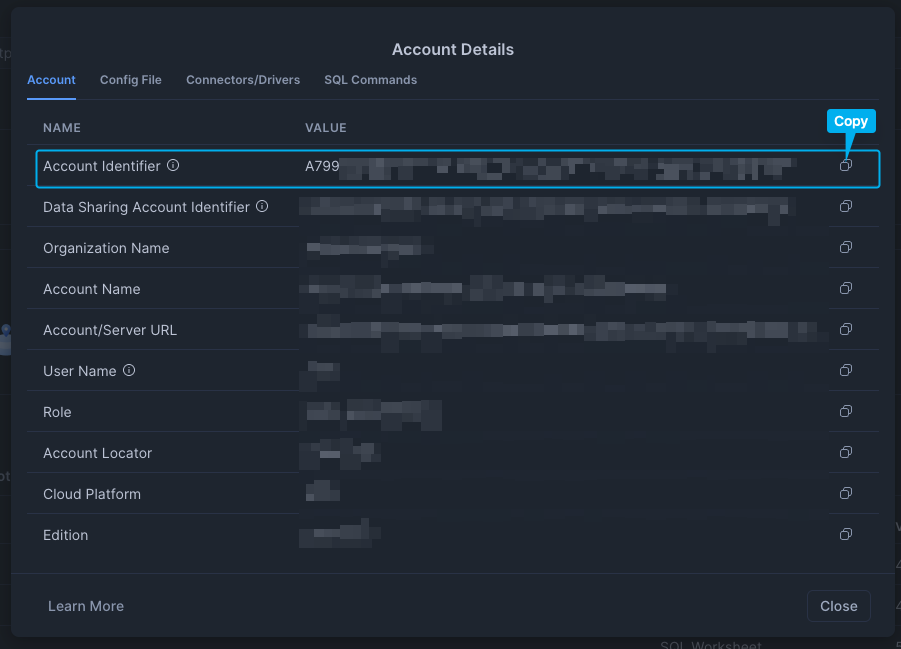
The last few lines in the script above contain a select statement you can run to assist you in copy / pasting into the form in SELECT. When me mention "script output" below, we are referring to this:
Here are some more details on each field:
- Friendly Account Name: You can put whatever you want here. If you only have one Snowflake account, then it’s common to just put your company name, for example: “Cyberco”. If you plan to connect multiple Snowflake account to SELECT, name them in a way you’ll be able to differentiate them using the account switcher on the top left. For example, you could have “Cyberco Prod” and “Cyberco Dev”.
- Account Identifier: An account identifier uniquely identifies a Snowflake accounts within your organization. There are two ways to find it, outlined below. Or, from the worksheet you ran the onboarding script, copy / paste the account identifier from the script output, shown in the screenshot above. (Near line 241 of the script.)
- Username: This will be the name of the new Snowflake user you created for SELECT. For example,
SELECT_USER. This is the variable you defined on line 4 and can be fetched using the finalselectstatement in the script. - Private Key: Paste the entire Secret Key you created in step 1. You should copy / paste the entire thing as-is, including the Begin and End tags as well as all of the line breaks.
- Passphrase: If you created an encrypted private key, put the passphrase here. Leave blank if you opted for an unencrypted private key.
- [OPTIONAL] Role: The script applies a default role to the user, so you can leave this blank if you ran the script as-is. Or, fill this out to meet your requirements.
- [OPTIONAL] Warehouse: The script applies a default warehouse to the user, so you can leave this blank if you ran the script as-is. Or, fill this out to meet your requirements.
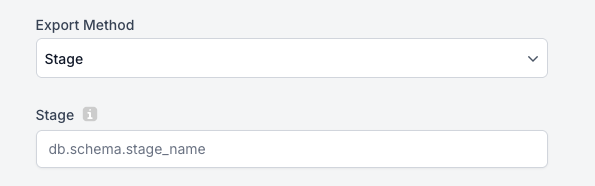
- Stage: In the drop down for Export Method, leave it as Stage, and pass the stage name returned from the script output on line 241.
- The stage name must be fully qualified.
- Procedure Name: To get the Procedure Name, copy and paste the result from the script output.
- Advanced: Only fill out the "Advanced" section if Snowflake was purchased through a reseller (i.e. AWS Marketplace) and you do not have access to the
organization_usageviews, mentioned above.
Once you click Add, the app will let you know if there were any errors. In most cases the error message should be clear, but reach out to us via the in-app chat if there are any problems you cannot clear up on your own.
Additional resources
Workload identity federation
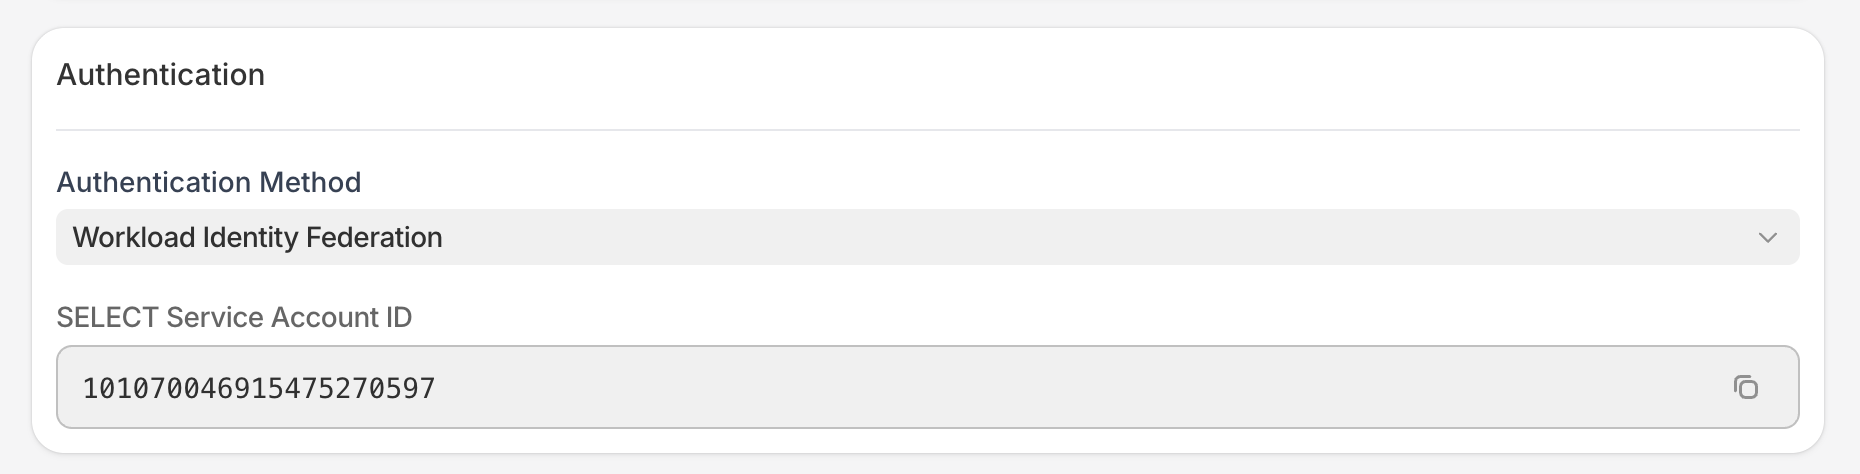
SELECT supports Snowflake’s Workload identity federation mechanism which is more secure than traditional methods like username/password or key-pair auth since it doesn’t involve sharing any secrets with SELECT.
To leverage this method, select “Workload Identity Federation” under the authentication method section. You will then be shown a SELECT Service Account ID (these are specific to each organization).
On the Snowflake side, rather than setting a password or public key, configure the Snowflake service user you created for SELECT with the workload_identity attribute set as follows:
No additional action is required outside of changing the way the Snowflake user is initially setup. Everything else in the setup script can be followed as normal.
To switch an existing password/key-pair user to workload identity, you can run:
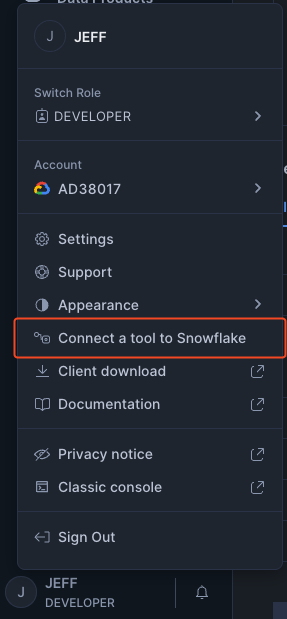
Locating your Snowflake Account Identifier
In the bottom left corner if the Snowsight UI, click your User Name / Profile, then choose "Connect a tool to Snowflake". On the subsequent screen you will find your account identifier.
Notes
1 We recommend using a tool like 1Password to both randomly generate and save the password. Alternatively, you can use a password generator website and store the password securely elsewhere ↩