

Monitors in SELECT allow you to set conditional alerts or scheduled reports sent to Slack, Teams, or Email. Our docs page walks through an entire example of creating a monitor and configuring destinations. Start there to get an idea of how to use monitors. This page will focus more on when to use monitors, what use cases are covered, best practices, etc.
When To Use Monitors
Monitors have two general uses:
- Proactive alerts for spikes, anomalies, or spend thresholds exceeded.
- Scheduled reports that are more FYI in nature.
You can create a Monitor for just about anything you’d want to know about your Snowflake account. If our out-of-the-box monitors don’t cover your use case, you can use Custom SQL Monitors to meet your needs.
Examples include:
- Weekly account spend report
- Monitor spikes for a usage group, warehouse, workload, etc.
- Report long running or expensive queries from a previous time period
- Report long running queries still running
- Monitor any measure: Cortex spend, credits, partitions scanned, pruning efficiency, rows inserted, etc. Any measure available in SELECT is available in Monitors.
- Get notified about new insights
- … and many other conditions you may want to track
If you have a use case for an alert or scheduled report, Monitors has you covered.
Types of Templates
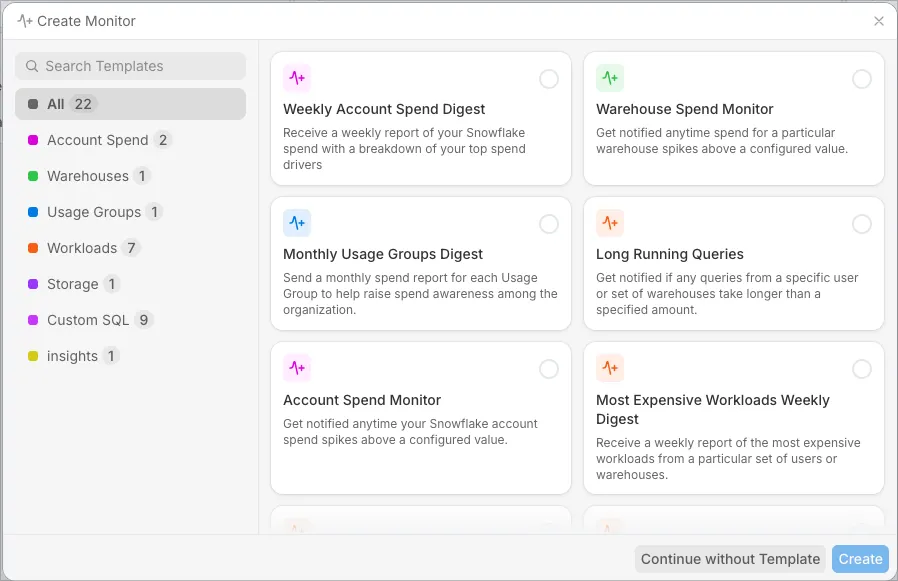
The easiest way to get started with Monitors is by using a template. Clicking “Create Monitor” will bring up a long list of templates to choose from. The templates are organized by category, so click through each category to see what types of templates are available.
Remember, templates are just a starting point. The idea is to customize a template to your exact needs.
- Account Spend templates:
- Use this to monitor spend on your entire account.
- The results are grouped by Warehouse by default but can be changed.
- This is the only type of template where the measure cannot be changed from “Spend” to some other measure.
- Warehouse templates:
- Use these when you want to filter by warehouse and get flexible measures.
- Usage Group templates:
- Use these to report spend or alert anomalies by Usage Groups.
- Workload templates:
- Stay on top of spend for various workload types: dbt, stored procedures, dynamic tables, BI tools, etc.
- Storage templates:
- Used to monitor total storage cost or volume.
- Insights templates:
- Get alerted about new insights in SELECT.
- Custom SQL:
- Use this when editing one of our primary data source templates does not work for you.
When to use Templates vs Create From Scratch
Since all templates are editable, starting with one is always a safe choice. It is possible to completely diverge from the template by selecting a different data source or editing any of the configuration. You would never need to close a template and start over if you choose the wrong one!
Use the “Continue without Template” option if you know exactly what you are after and are already familiar with SELECT’s monitor creation workflow.
Custom SQL Monitors
Custom SQL Monitors are a powerful option to monitor any condition in your Snowflake account not covered by one of our standard data sources. Custom SQL Monitors have an important distinction from other monitors: they run directly in your Snowflake account with the permissions of your service user. Therefore, if you want, you can expand the permissions of that user to access log tables (or anything you’d like) outside of the Snowflake metadata database.
Since Custom SQL Monitors run in your account, this is the only way you can monitor activity in real-time. All other standard Monitors run on SELECT’s backend, which only updates your account once per day.
Here are some examples of what you can do with Custom SQL monitors that is not possible with our standard monitors.
- Alert on long running queries still running now.
- Alert on intra-day anomalies such as hourly warehouse spikes, data transferred spikes.
- Report failed tasks every hour.
- Report user metadata, such as users without MFA or users with RSA keys.
- Monitor custom logging tables by expanding the permissions of the SELECT user.
Custom SQL Monitors are the only monitor type that can be scheduled with Cron. Standard monitor types are scheduled Daily, Weekly, or Monthly, and trigger after your Snowflake data is synced to SELECT for that day.
Understanding the Flow of Creating a Monitor
Our docs page walks through the monitor creation process in detail. Here’s a screenshot with each configuration section collapsed, so you can get an idea for the steps involved in creating a monitor:
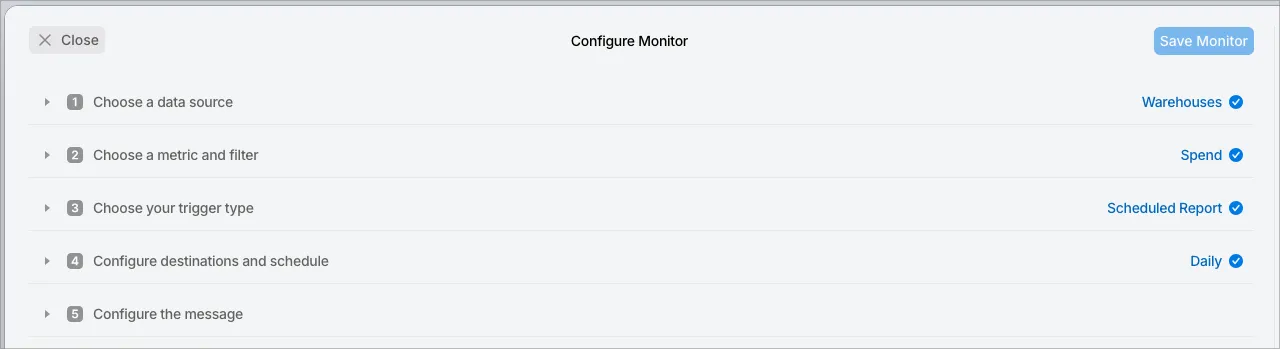
You can see at a high level the creation process is as simple as filling out the form. Consider each section carefully as you design a effective monitor.
Best Practices for Monitor Schedule and Trigger Conditions
There is a bit of an art to selecting a monitor schedule. From a high level, you want to avoid alert fatigue while staying informed. If notifications come too often, you learn to ignore them. Here are some guidelines to follow:
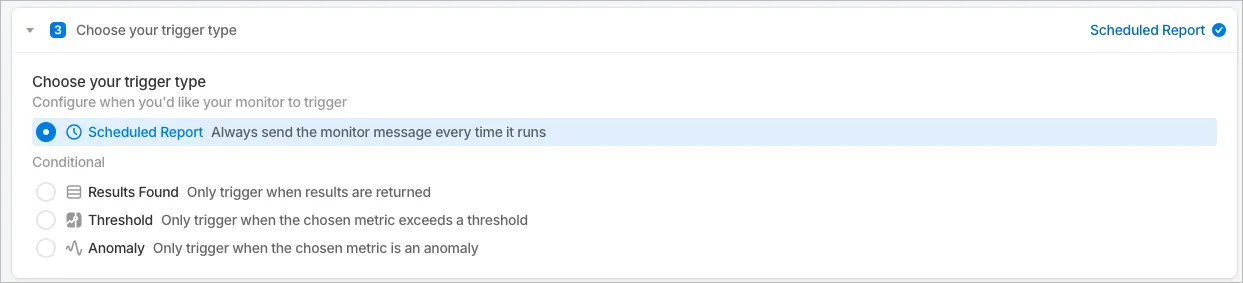
- Scheduled Reports are sent every time on schedule, without checking thresholds or whether results exist. These serve as simple FYI updates on your account activity.
- Schedule these weekly at most.
- Use monthly reports to update stakeholders on Snowflake activity.
- Results Found is commonly used when you filter a measure or in Custom SQL Monitors. It only triggers if the SQL statement produces at least 1 row. Since these monitors typically filter on a measure, the custom message and trend chart are unavailable. Common use cases for “Results Found” monitors are:
- Alert if a failure log exists.
- Alert if a long running query exists.
- Alert when any condition exists.

- Threshold monitors are great when you only want to get alerted if the data exceeds a certain threshold. This option allows you to still see the trend chart and custom message when a threshold is exceeded. Example: Daily spend exceeds $1,000.
- Anomaly monitors are great for alerting on changes or sudden spikes in your account.
Results Found, Threshold, and Anomaly monitors execute on a schedule (daily, weekly, monthly) after your Snowflake data is synced to SELECT for that day but only send if the conditions are met.
Best practice is to become familiar with each type of monitor and carefully choose the trigger condition and schedule.

