

CI/CD and DevOps in Snowflake (Part 2): Step-by-Step Implementation Guide
Tomáš SobotíkWednesday, July 09, 2025
In the previous blog post, we covered various DevOps features in Snowflake. These features represent individual building blocks for maintaining your Snowflake infrastructure as code and doing so automatically.
In this blog post, we’ll focus on how to combine those features to create CI/CD pipelines for automated deployment of Snowflake infrastructure using native Snowflake features like CREATE OR ALTER, Git integration, or EXECUTE IMMEDIATE FROM. We use GitHub as our repository service and GitHub Actions as our orchestrator.
Let’s start with a brief introduction to GitHub Actions workflows.
Github Actions workflows
GitHub Actions is a powerful CI/CD platform built directly into GitHub that enables developers to automate software workflows through event-driven pipelines. It uses the concept of workflows defined in YAML files, stored in the .github/workflows/ directory of your repository. Each workflow can consist of one or more jobs that run on virtual machines called runners. These runners can be hosted by GitHub, so you don’t need to manage anything. A runner is automatically assigned to your pipeline when the workflow is triggered, or you can use a self-hosted runner.
To create a pipeline, you need to define several key elements:
Trigger
This can be an event in the repository (e.g., push, pull_request, etc.), a scheduled cron job, or a manual trigger.
Runner environment
This defines where your code will run—the operating system of the runner. Common examples include ubuntu-latest or windows-latest.
Automation structure
Next, you need to define the automation itself. This is a series of steps that need to be executed. Keep in mind that every time your code runs, the runner machine starts in a default, clean state. That means you need to prepare the environment for your specific job—such as installing required languages (e.g., Python), fetching the code from your repository, and reading environment variables. Individual steps can consist of shell commands, script executions, or pre-built actions. Each step can also take advantage of contextual information, such as ${{ github.event_name }} or ${{ secrets.SF_ACCOUNT_ID }}.
These basic characteristics make GitHub Actions well-suited for running various CI/CD pipelines where you need to securely manage database credentials, execute SQL scripts, deploy changes across environments, and track who made changes—all with built-in version control integration.
Snowflake CI/CD pipeline for account infrastructure
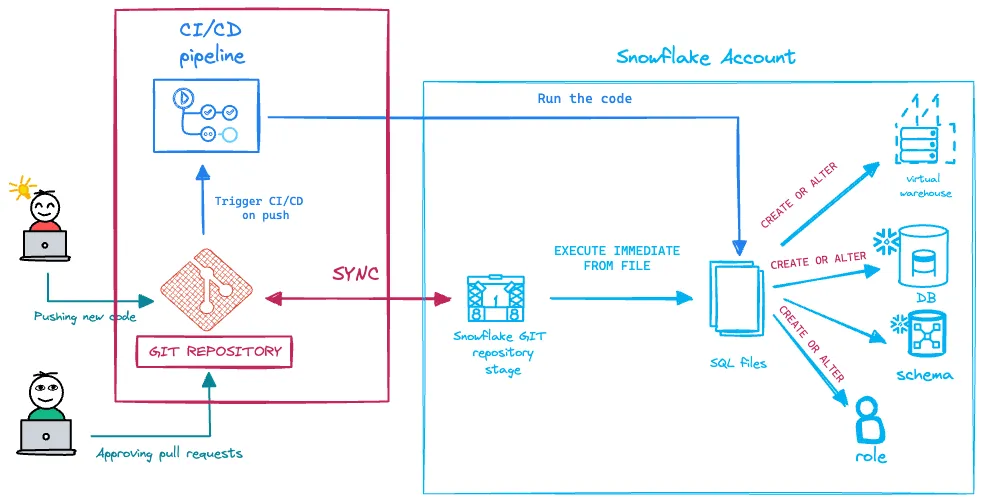
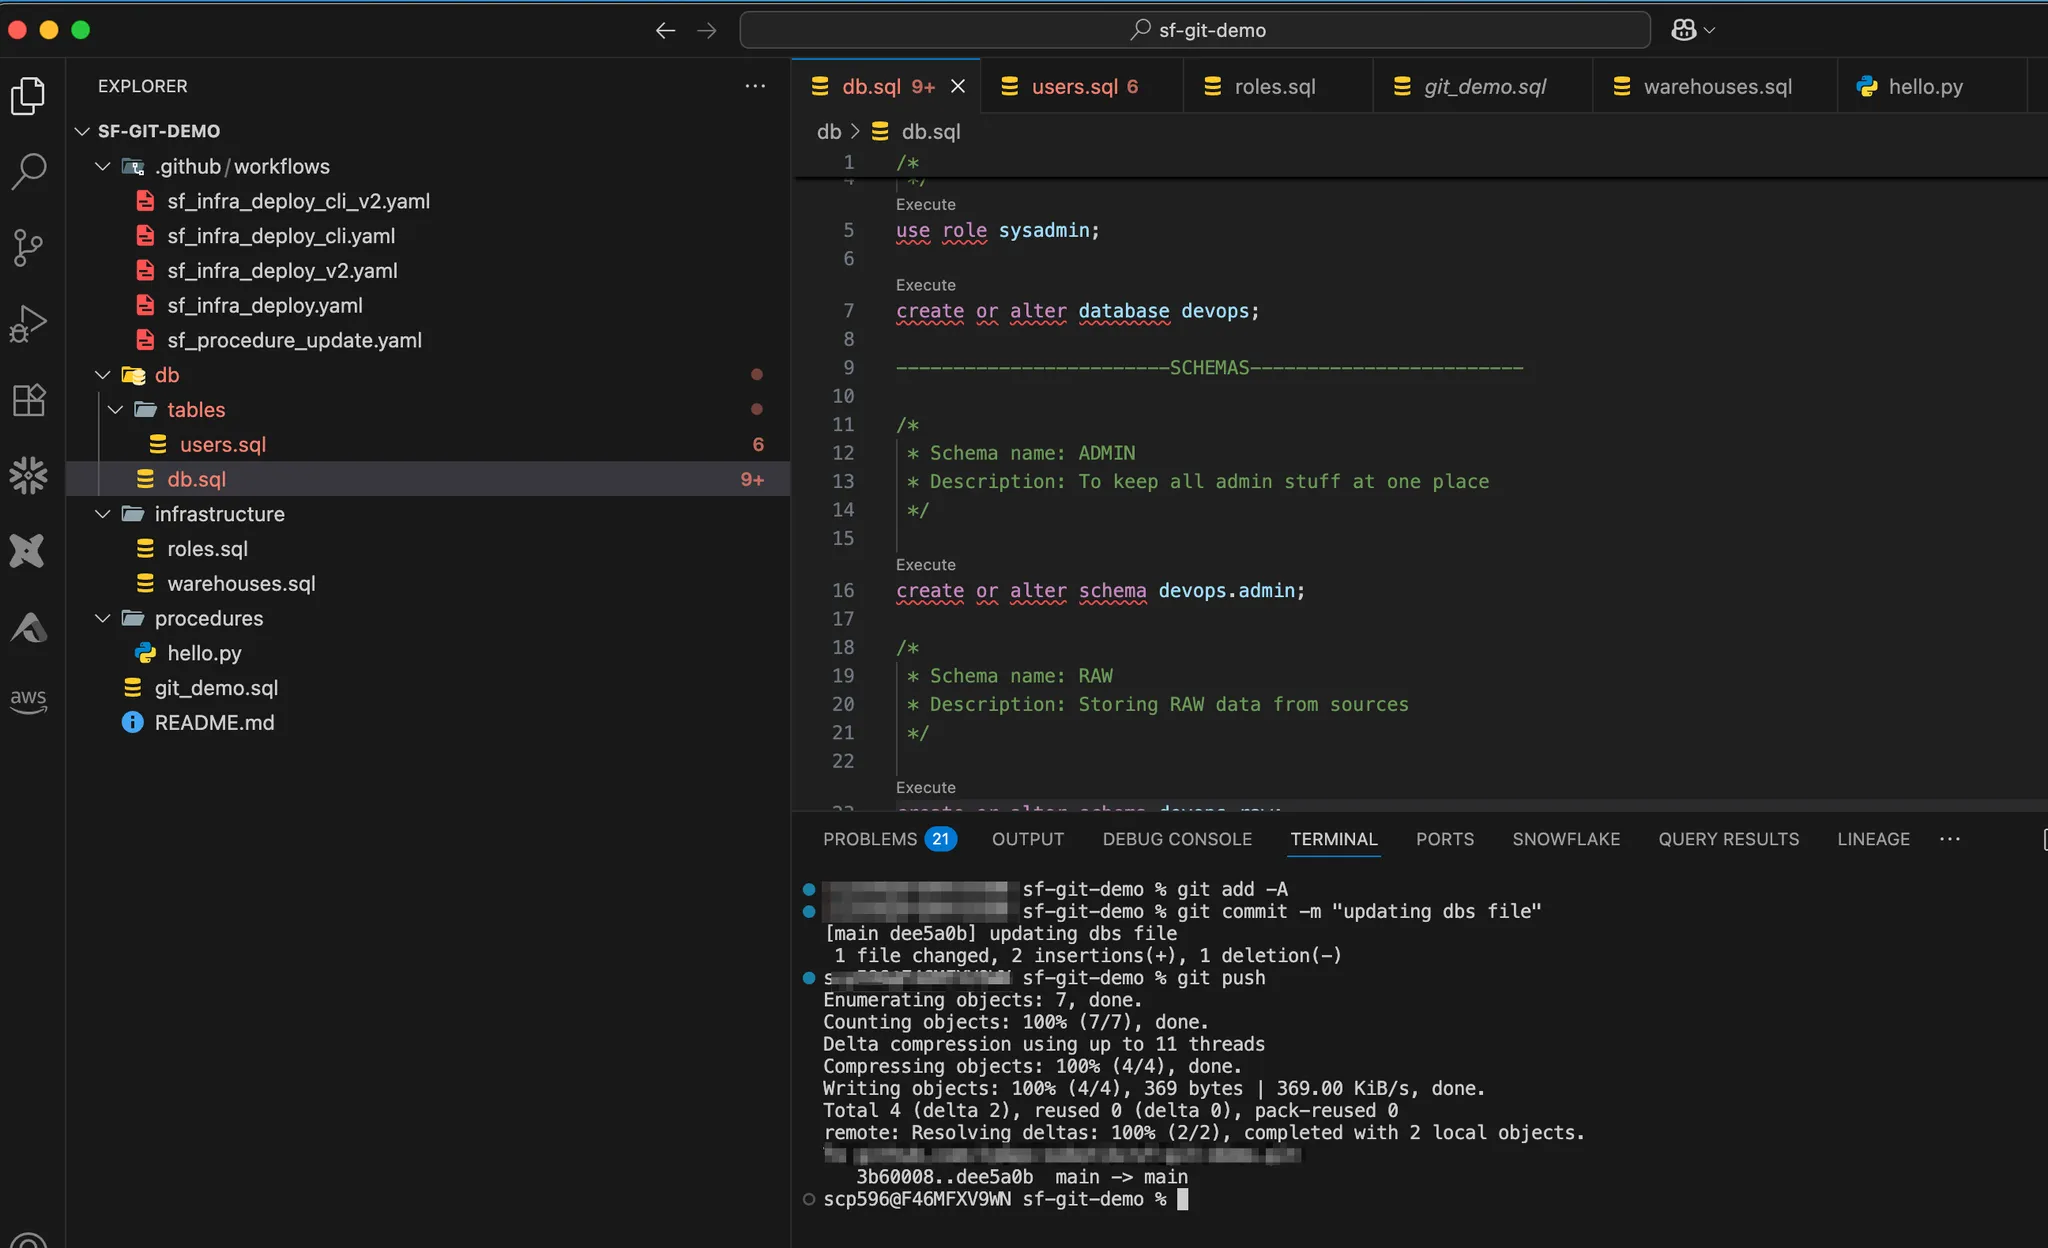
We’ll work locally in VS Code, where we’ll develop the SQL scripts and the YAML definition for the GitHub Actions workflow. Once everything is ready, we’ll push the changes to the remote repository, create a pull request, and merge the changes into our dev branch. As shown in the diagram, we’ll leverage several Snowflake features to make this happen. We’ll also create two versions of the CI/CD pipeline:
1 Using the Git extension in Snowflake In this approach, GitHub Actions serves only as an orchestrator. Thanks to the Git extension, we can run all the code directly within Snowflake.
2 Running the code on a GitHub runner using SnowCLI If you prefer not to use the Git extension in Snowflake, there’s an alternative: execute the code directly on the runner machine using the Snowflake Command Line Interface (SnowCLI). We'll cover that option as well.
Snowflake infrastructure creation
Let’s create our infrastructure first and store it in several sql files.
Our warehouses:
We also need a role:
And finally our database and schema:
CI/CD Pipeline Utilizing the Git Stage
We’ve prepared the initial SQL scripts, and now it’s time to develop the GitHub Actions workflow. This workflow leverages the Git extension in Snowflake. It relies on an active integration between your Snowflake account and your GitHub repository. We’ve covered how to set up this integration in a dedicated blog post on ~Snowflake’s Git integration~.
Let’s walk through the code to explain what it does.
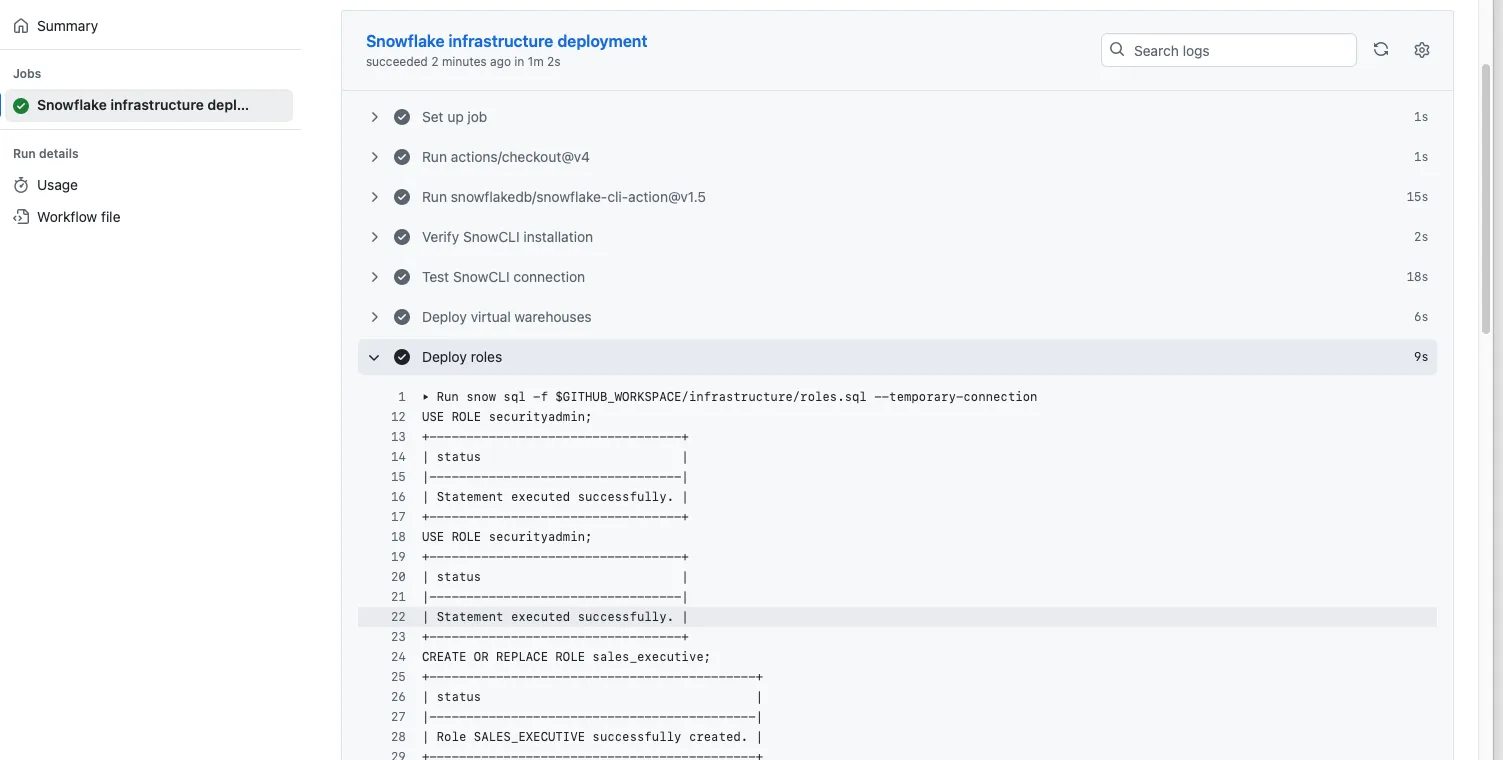
At the beginning, we configure environment variables needed to connect to Snowflake. These values are retrieved from GitHub Secrets. Next, we define the trigger—in this case, we use workflow_dispatch, which means the workflow must be triggered manually from the repository.
The rest is fairly straightforward. We need to install SnowCLI on the GitHub runner machine so we can:
- connect to Snowflake
- trigger the required commands
There is a native ~GitHub Action~ provided by Snowflake that simplifies the setup and connection management.
First, we synchronize our Snowflake Git repository stage with the remote repository using the ALTER GIT REPOSITORY command. This pulls the latest changes directly into the Git stage within Snowflake.
Next, we use EXECUTE IMMEDIATE to run code directly from our SQL files. We’ll deploy warehouses, roles, and databases with schemas. And that’s it—a simple and effective workflow for automatically deploying changes to your Snowflake infrastructure as code.
CI/CD pipeline executing the code on the GitHub runner
Let’s build a similar pipeline, but this time we’ll execute everything directly on the GitHub runner machine, without using the Snowflake Git stage. While the Git stage is a powerful feature, it still has some limitations—such as being read-only and inaccessible to repositories behind private networks. These constraints might be reasons to avoid using the Snowflake Git integration in certain scenarios. Here is our YAML workflow definition:
name: Deploying Snowflake objects with cli v2
Let’s focus on differences compared to previous version. This time we have to bring our code from remote repository into the runner machine. We use for that other action called checkout which basically pull the code from remote.
Then we can use the SnowCLI again but this time we run the code from files stored on runner machine instead of files in repository stage.
Improvements
This was a simple example of how to develop a basic CI/CD pipeline for deploying Snowflake infrastructure. There is plenty of room to make it more “production ready.” In a real environment, you would have:
- different pipelines for each environment (dev, prod)
- triggers on push and pull request events limited to specific branches
- different steps running on push events and pull request events
It would be great to have a "plan" step, like in Terraform, that shows what resources will be created, updated, or deleted before making changes. I hope we see similar functionality in these native Snowflake features.
Wrap up
This blog post covered how to use Snowflake’s native DevOps features for continuous integration and deployment. We implemented a CI/CD pipeline using a GitHub Actions workflow to deploy Snowflake infrastructure objects as code directly from our remote repository—simply by pushing updates from local machines to the repo.
This is the final part of our series dedicated to running DevOps in Snowflake. We covered this topic in three blog posts:
- A deep dive into Snowflake’s Git Integration
- CI/CD and DevOps in Snowflake (Part 1): Comprehensive Overview of Features and Tools
- CI/CD and DevOps in Snowflake (Part 2): Step-by-step Implementation Guide

Tomas is a longstanding Snowflake Data SuperHero and general Snowflake subject matter expert. His extensive experience in the data world spans over a decade, during which he has served as a Snowflake data engineer, architect, and admin on various projects across diverse industries and technologies. Tomas is a core community member, actively sharing his expertise and inspiring others. He's also an O'Reilly instructor, leading live online training sessions.
Want to hear about our latest data cloud learnings?Subscribe to get notified.
Get up and running in less than 15 minutes
Connect your Snowflake, Databricks, or BigQuery account and instantly understand your savings potential.

